Showing posts with label SQL Server. Show all posts

Sunday, August 15, 2021

Perform CRUD operation on SQL Server DB table from Azure Logic APP

In this blob we are going to see how we can perform CRUD operation on SQL server DB from Logic APP. We will modify our existing Logic APP that we created in previous blog.

We have already performed Insert operation in previous blog and here I am going to explain other 3 GET, PUT, DELETE operation here.

Update Existing Logic APP:

Let’s update existing logic app “db-access-demo” and delete “Insert Row” SQL server connector from it which is the second connector in the Logic APP.


Read Operation:

Change the HTTP operation to GET as we are going to get data from database, earlier it was POST method.


Click on add connector on the same place and add “Get Rows v2” connector. Since we have already created SQL connection, so database details and table name are already visible here in dropdown.


Choose server, Database name and the “emp_details” table as illustrated below.


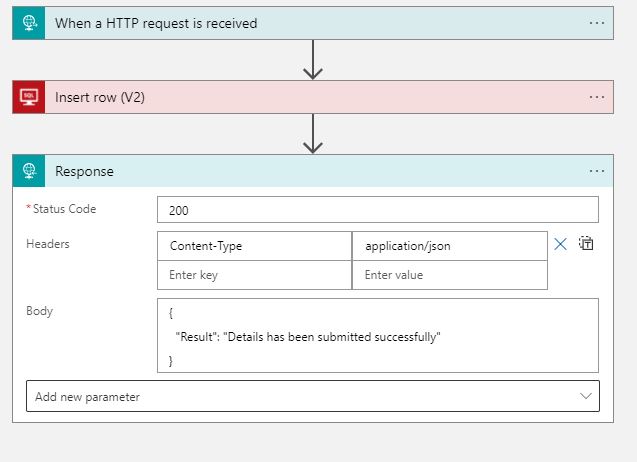
Now in the response connector where we have to provide output. In the Body textbox, select the “value” dynamic content which is coming from the previous “Get row” connector as illustrated below.


 Save the Logic app and open POSTMAN tool to test the logic app. We are going to get all the data from the database without having any condition to keep it simple. Test the Logic app by hitting the URL you should be able to see the result coming in an array JOSN as mentioned below.


Update Operation:


Now again let’s delete the existing “Get Rows” SQL connector and replace it with the “Update row V2” connector. In the Request Connector, change the HTTP method from GET to PUT.


Map the parameter which you want to update similar to the below example. Make sure “Row id” has to be mapped with the “Primary Key” in the database as we have to update a row against the primary key. In our example we have “EmpId” is the primary key, so I have mapped it with “Row id”. You can also map another parameter based on your requirement.


In the response connector, replace the Dynamic body content to below hardcoded response with 200 status code.


{
   "Result":"Details has been updated successfully"
}


Now give it a test from the POSTMAN tool, you should be getting expected response.


You can also verify the database table details; your value should be updated here.


Delete Operation:


Let’s now see how we can perform Delete operation. Remove the Update SQL Server connector from the Logic App and replace it with the “Delete row (V2)” connector as we are going to delete a record from table.


Provide the connection details similar to other operation we just did.

Provide the “EmpId” parameter to “Row Id” textbox as it expects a Primary Key.


Update the response body static response with below one.


{
   "Result":"Details has been deleted successfully"
}


 Save the logic app and hit the request from the POSTMAN. You should see the success response.


Let’s now verify the record in the database, that should have been deleted.


Thursday, August 12, 2021

Access and Insert Data in SQL Server Database from Azure Logic APP

In this blog we are going to see how to access database and insert records using Logic App. Azure Logic App provides many inbuild connectors and SQL server is one of them. Using this SQL Database connector, we can easily perform CRUD operations. Having said that, Logic app has other DB connectors as well. In our case, we will use SQL server Database connector.

Let’s get started.

Create a SQL Server Database Instance:

First, we have to create a SQL server DB instance so that we can connect that from Logic APP. We can choose the SQL server service in the Azure resources and provide some details like server name, location, username and password as mentioned below.


Once we have that in place, we can whitelist our IP address to access it from our machine.


I have created a table with the name of “emp_details” and we will use this table to store information from the Logic APP.


Please make EmpID as primary key as we need it for next tutorial (I haven’t made it as primary key here in above screenshot but that has been changed with primary key.)

Create a Logic APP:

Let’s create a Logic APP, I have given “db-access-demo” and choose Trigger as HTTP. Use method as POST so that we can post a body from HTTP URL to insert records in database.

As a payload schema use below example:

{
   "EmpId":"string",
   "EmpName":" string ",
   "EmpAddress":" string ",
   "Qualification":" string "
}


Click on the Next step and search for “sql server” in connector search area as mentioned below. Once that is visible choose “Insert row (V2)” Action.


It will ask you to create a connection, where you have to provide database connection details like username, password, server url etc. once provided click on create


If all good, then you can see the details visible in droop down like database name and table name.

Choose “emp_details” as table and select all the parameter as we are going to insert all 4 details of the employee.


Select and map the parameter which is coming from the HTTP POST body in the request to the Database column as per below screenshot.


Add a “Response” connector, where we will provide the HTTP response body, for now we are using static one.


Save the logic app and try running it from the postman, you should be getting 200 success response similar to below screenshot

You can use the similar example that should match with your DB table structure and schema that you defined in HTTP connector


{
   "EmpId":"111",
   "EmpName":"Shri",
   "EmpAddress":"Wellington",
   "Qualification":"IT"
}


Since we haven’t received any error these records should be inserted into the Database. So execute query to see the record and you should see that records have been inserted from the Logic APP


You can also see in the Logic APP logs to analyzed that what happened in each connector.