Thursday, July 29, 2021

Call a Rest API from Azure Logic APP

I am going to talk about a very common scenario in our day to day life as integration developer. There are lot of requirement or scenario where we have to call 3rd party APIs. In one of my previous blogs I have shown how to call SOAP API but, in this blog, we will see how to call a 3rd party Rest API.


Backend Service:

We have a backend rest service with POST operation and its request and response looks like below.


URL: https://<hostname>/xxx/xxx

Method: POST

Request:

{
   "Name":"testname",
   "PhoneNumber":"0123456789",
   "Message":"test message"
}


Response:

Once we submit above request payload, the message is submitted in database and returns with 201 Created response code with below payload.

{
   "Result":"Details has been submitted successfully"
}


We have to call above API from the Logic App. We will also do some transformation inside the logic app to understand, how easy to do transformation in Logic App if it comes to one to one mapping


Logic App:

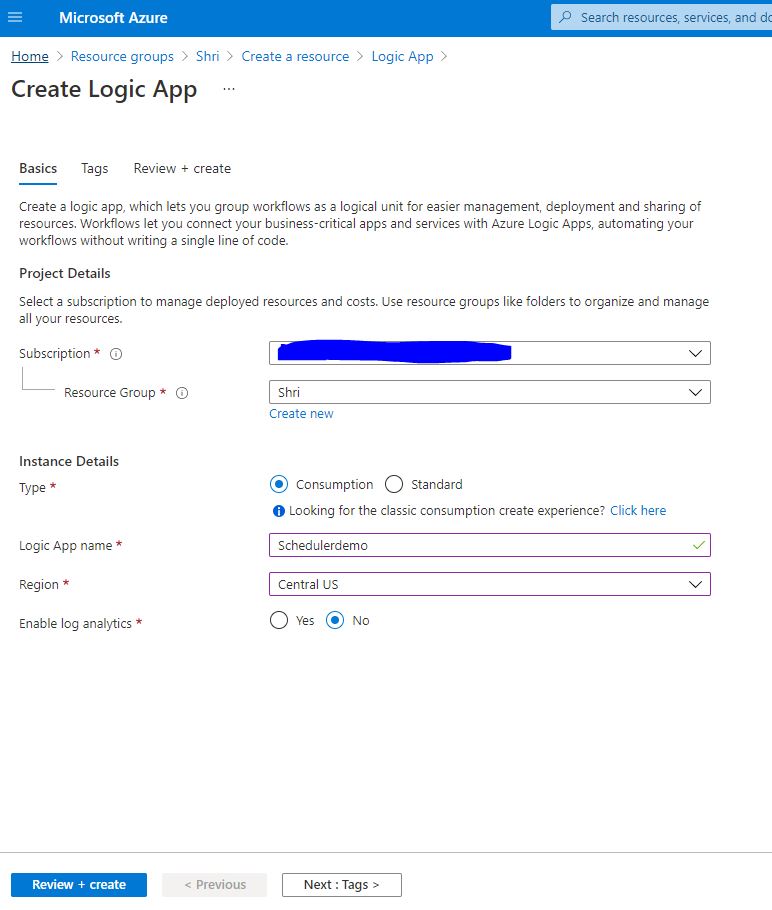
  • Let’s create a simple consumption-based logic app by choosing your subscription and resource group, I have given “call-rest-api-demo” name to my Logic App.


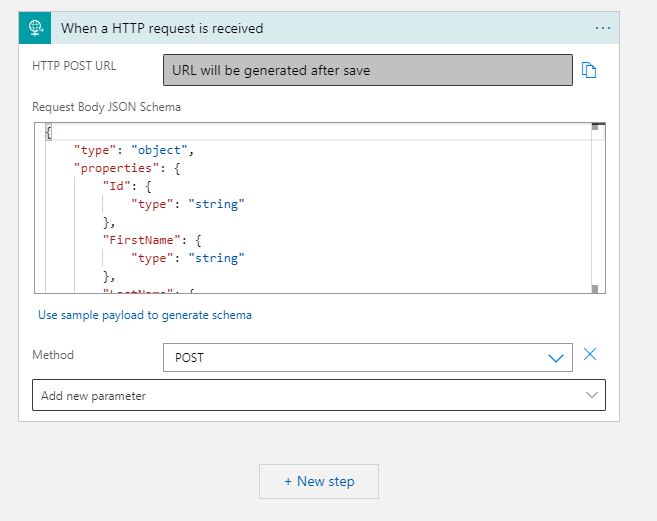
  • Choose trigger as HTTP, as we are going to call this Logic App from the API endpoint, so we need to have trigger as HTTP.


  • Let's now provide the input payload schema so that we know what the expected payload is we need to pass to call this Logic App.


  • To generate the schema, we can pass the sample JSON payload and Logic App connector will create the schema for us.


{
   "Id":"11",
   "FirstName":"Shri",
   "LastName":"0123456789",
   "Message":"Test Message",
   "ContactNumber":"423422234",
   "Address":"Wellington"
}


  • Give method as POST, we will be passing request payload with POST HTTP method.


Choose the HTTP connector in next step by clicking “+ New Step”. And provide the below details

Method: POST

URL: backend service URL

Body: 

Provide the static body and replace the value from the dynamic content as mentioned below. If you see, we are only using required parameter and also doing some transformation for example FirstName + LastName becomes Name as this required in backend service to save data into the database. However, we are not managing backed service here.


  • Now we set the response what we get it from the backend, we are not modifying the response at all. Backend response will be returned by this Logic APP.


  • Select the dynamic “Body” which is being returned from the HTTP connector. Similar to below screenshot.


  • Save the Logic App, you will see a URL generated at HTTP trigger connector.


  • Use the HTTP URL with HTTP POST method and provide the below JSON payload as request and submit the request.

{
   "Id":"11",
   "FirstName":"Shri",
   "LastName":"Kant",
   "Message":"This message is for 3rd party service",
   "ContactNumber":"423422234",
   "Address":"Wellington"
}

  • You will receive the success response, however this response initially received at Logic App from the backend service and then return to the client (Postman, in this case) without any modification.


  • If you want to see what has happened step to step, then go to the Run History and open any transaction. Main request has been filtered to call backend service and “FirstName” and “LastName” attribute becomes “Name” as we have concinnated both strings.


  • Below screenshot is from the response connector


Create scheduler in Azure Logic APP

In this blog we are going to see how to create a schedule-based job in Logic App. By the schedule-based job, we can run the flow immediately, later or any recurring interval. Once the flow is executed, we can call any function like database, API, blob etc. from the Logic App itself. In the real word scheduling-based job is very useful where we have to do same kind of task on a recurring interval like sending reports, clean up data from a storage on a specific interval or even calling an API on an interval time.


We have seen many examples where we are calling different kind of connector from the Logic App. So, we can easily integrate with Logic App. Here we are going to create a very simple Scheduler-Based Logic App which will print the UTC time at every one minute.


Create a Logic App:

We have created many Logic App in previous blogs so create a similar one again. I am using consumption-based logic app and given “schedulerdemo” name.


  •  Click review and create after choosing your location and resource group


  • In above step I have chosen “Recurrence” as trigger, this is the trigger which will create a scheduled based job.


  • Now look closely in this component and see different option in the “Frequency” dropdown. So, if you click on “Add New Parameter” where you can choose the trigger time zone. Maybe you have to choose a time zone where your data resides. You will see all the country time zone and choose accordingly.


  • Now observe another example of “Frequency”, once you select “Week” you will see all the days to choose from.


  • If you choose “Day” in “Frequency” dropdown, you will see the no of days are listed so that you can choose which date you want this Logic App to run.


  • To keep it simple, I am going to use frequency every minute and adding a variable “calltime” to get UTC time as mentioned below


  • I have added a dynamic expression “utcNow()” to get UTC time whenever which Logic App runs (every minute at the moment)


  • I have waited for 3 minutes and can see in “Runs History” tab that Logic App has run 3 times at one-minute interval.


  • You can select any run history link to see it more details. In below screenshot you can see it is running at 1 minute internal and printed UTC time.


Monday, July 26, 2021

Listen message from Azure Service Bus in Logic APP


In this blog, we are going to receive the message from the queue. We will try to receive the same message and other from the same queue that we pushed to service bus queue in last blog. After receiving the message, we will try to process it.


Mostly things we already have ready so let’s create a Logic app. This time it will be triggered from the service bus not HTTP.


Create a Logic APP:


  • We will follow the same process as we created multiple Logic APP so far. I am using again consumption-based Logic App and given “sb-queue-listener” name.


  • Click Review and Create.


  • Choose Trigger as “When Request is received in a Service Bus Queue”, as mentioned above.


  • We will see the below screen; we have already created a connection in last blog. If you have multiple connection use one which was used in earlier blog to push message in “logicapp-queue-demo” queue


  • Choose the Queue “logicapp-queue-demo” from the dropdown if you have multiple queue, it should automatically populated if connection is correct.


  • Use the frequency that how often logic App should look into the queue for a message. I have used default in every 3 min.


  • Click on “Next Step” to initialize a variable in which we will store the message received from the queue. Search variable in the search bar and select “variable” as highlighted.
  • Choose “Initialize Variable” as Action.


  •  Below screen will populate, where give the variable name as “sb_response”, select type as String and choose dynamic “Content” (from Service Bus) in “Value” section as illustrated below.


  • Save the Logic app and wait for 3 min. You can see that Logic App has been triggered as there was a message in the queue already. If message is not there in the queue then submit the message in the same queue by following the last blog, where we can submit message in “logicapp-queue-demo” queue from the POSTMAN tool.


  • You can also run the what happened with the logic app by clicking the Run History log.


  • You can also go to the service bus to verify that message is not there as processed by this Logic App.


Send a message to service Bus from Logic APP


Service bus is used to make flow asynchronous. If we have a large integrated system then its good idea to use service bus so that even if listener services are down, we won’t lose any message as they will kept on queue. It works on FIFO basis (First in First Out). Azure service bus also provides capabilities of publisher and subscriber model, multiple subscribers can get the same message to process once a message is pushed. You can get more details of Azure service bus by visiting its website here https://azure.microsoft.com/en-us/services/service-bus/.


In this blog, we are going to see how we can push the message from the Logic APP with HTTP trigger to the service bus queue. We are going to create a very simple example where we will POST the JSON payload to Azure Service Bus Queue from the Logic APP.


Create a Service Bus Namespace:

If you don’t have any existing service bus namespace then create one, choosing service bus name space in azure portal.


Provide a name and choose “Standard” or “Basic” pricing tier. I have chosen Standard as we can also create topic in it. Basic doesn’t provide topic creation. So, choose your resource group, pricing tier and give a unique name.


Once you have namespace created, create a queue by clicking the “Queue” icon as highlighted.


Provide the queue name as above and you can choose some of the properties as well. To keep it simple I have accepted all the default setting. I have given queue name as “logicapp-queue-demo”.

Now our service bus is ready to use, lets proceed with Logic APP.


Create a Logic APP:


  • I am creating again a consumption-based Logic APP with HTTP trigger, which will push the message to Service Bus queue.
  • Create one as mentioned below, I have given Logic App name as “send-message-service-bus-queue


  • Click Review and create.


  • Click trigger as “HTTP” as mentioned above.


  • In next step provide a JSON example to create a schema, similar request will be used to push the message. I have taken simple below JSON example.


{
   "Name":"name",
   "Message":"test",
   "PhoneNumber":"0123456789"
}


  • Choose HTTP method as “POST”.


  • In “New step”, search Service Bus in search bar and choose Service Bus connector.


  • Choose Action as “Send Message


  • This will ask you to create a connection if you haven’t created already. Provide the connection name and follow the process. Once connection is created, you should be able to see queue listed on the dropdown. Choose one in which we have to send the message. I have selected “logicapp-queue-demo”, where I have to push the message.


  • Click on “Add New Parameter” and select “content” as we have to pass HTTP body to the queue.


  • From the dynamic window, choose Body as content. This is what we are pushing to queue.


  • Click on “New step” and let’s add a response connector now as mentioned below.


  • Choose response connector and provide a static response message.


{
   "status":"Message has been sent successfully to service bus queue"
}


  • Now save the logic app, as soon as you save the logic app, you can see that a new HTTP URL has been generated.


  • Create a POST request with this URL in your favorite browser. I am using POSTMAN here.


  • Pass the below payload and hit the request. You should see the 200 response as per above screenshot.


{
   "Name":"name",
   "Message":"test",
   "PhoneNumber":"0123456789"
}


  • You can see the content and each step process from the Run History in logic app.


  • Since we have just pushed the message but haven’t taken it out, so we can see the message in the queue.


  • Go the queue we created and see the message. You can see the 1 message is there as mentioned below.


  • We can also see the actual message from the “Service Bus Explorer”. Click on that, then click on “Peek” tab, select “Queue” if not already then click on “Peek” button. Similar message should be visible.


  • Now click on the message, a window should popup, where you can see the actual JSON payload with its details.


  • In the next blog, we will try to receive this message and try to process it.