Service bus
is used to make flow asynchronous. If we have a large integrated system then
its good idea to use service bus so that even if listener services are down,
we won’t lose any message as they will kept on queue. It works on FIFO basis
(First in First Out). Azure service bus also provides capabilities of publisher
and subscriber model, multiple subscribers can get the same message to process
once a message is pushed. You can get more details of Azure service bus by
visiting its website here https://azure.microsoft.com/en-us/services/service-bus/.
In this
blog, we are going to see how we can push the message from the Logic APP with
HTTP trigger to the service bus queue. We are going to create a very simple
example where we will POST the JSON payload to Azure Service Bus Queue from the
Logic APP.
Create a Service Bus Namespace:
If you
don’t have any existing service bus namespace then create one, choosing service
bus name space in azure portal.
Provide a name and choose “Standard” or “Basic” pricing tier. I have chosen Standard as we can also create topic in it. Basic doesn’t provide topic creation. So, choose your resource group, pricing tier and give a unique name.
Once you
have namespace created, create a queue by clicking the “Queue” icon as
highlighted.
Provide the queue name as above and you can choose some of the properties as well. To keep it simple I have accepted all the default setting. I have given queue name as “logicapp-queue-demo”.
Now our
service bus is ready to use, lets proceed with Logic APP.
Create a Logic APP:
- I am creating again a consumption-based Logic APP with HTTP trigger, which will push the message to Service Bus queue.
- Create one as mentioned below, I have given Logic App name as “send-message-service-bus-queue”
- Click Review and create.
- Click trigger as “HTTP” as mentioned above.
- In next step provide a JSON example to create a schema, similar request will be used to push the message. I have taken simple below JSON example.
{
   "Name":"name",
   "Message":"test",
   "PhoneNumber":"0123456789"
}- Choose HTTP method as “POST”.
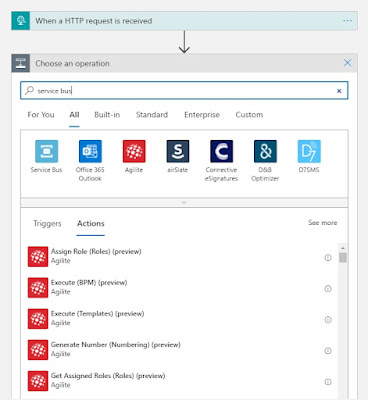
- In “New step”, search Service Bus in search bar and choose Service Bus connector.
- Choose Action as “Send Message”
- This will ask you to create a connection if you haven’t created already. Provide the connection name and follow the process. Once connection is created, you should be able to see queue listed on the dropdown. Choose one in which we have to send the message. I have selected “logicapp-queue-demo”, where I have to push the message.
- Click on “Add New Parameter” and select “content” as we have to pass HTTP body to the queue.
- From the dynamic window, choose Body as content. This is what we are pushing to queue.
- Click on “New step” and let’s add a response connector now as mentioned below.
- Choose response connector and provide a static response message.
{
   "status":"Message has been sent successfully to service bus queue"
}- Now save the logic app, as soon as you save the logic app, you can see that a new HTTP URL has been generated.
- Create a POST request with this URL in your favorite browser. I am using POSTMAN here.
- Pass the below payload and hit the request. You should see the 200 response as per above screenshot.
{
   "Name":"name",
   "Message":"test",
   "PhoneNumber":"0123456789"
}- You can see the content and each step process from the Run History in logic app.
- Since we have just pushed the message but haven’t taken it out, so we can see the message in the queue.
- Go the queue we created and see the message. You can see the 1 message is there as mentioned below.
- We can also see the actual message from the “Service Bus Explorer”. Click on that, then click on “Peek” tab, select “Queue” if not already then click on “Peek” button. Similar message should be visible.
- Now click on the message, a window should popup, where you can see the actual JSON payload with its details.
- In the next blog, we will try to receive this message and try to process it.


No comments:
Post a Comment