To transfer the message in
WSO2 ESB XQuery can also be used like Script, XSLT and payload mediator. XQuery
provides the facility to query like database within the xml. We can filter xml
response with xml query so based on the requirement we have to use transform mediator.
We can define XQuery in
the synapse with below syntax.
<xquery key="string" [target="xpath"]>
<variable name="string" type="string" [key="string"]
[expression="xpath"] [value="string"]/>?
</xquery>
In above syntax we have to
provide some parameter as mentioned below.
- In key we have to provide a unique String name of it which can be used in service logic to call XQuery. It specifies the registry of the XQuery file.
- Target is an attribute which specifies the node of the SOAP message that should be transformed. By default the first child of the SOAP body is selected.
- In variable we can pass an attribute or variable value like in java function which can be retrieved in XQuery file to process further.
Console
UI:
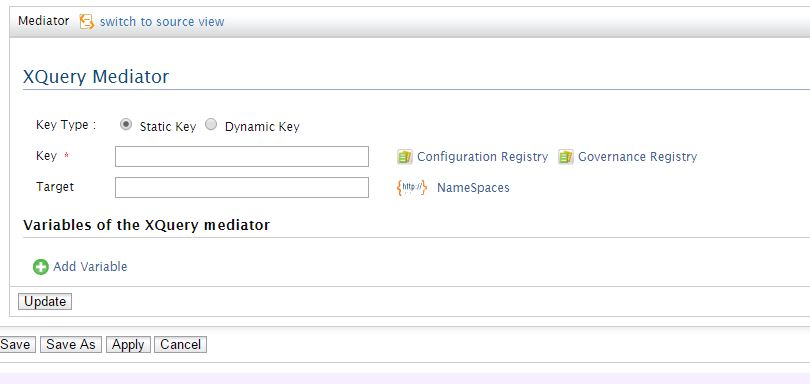
XQuery comes in the
category of transformation, so if you select transform menu, you can see XQuery
option in it.

You can fill the required
details like Key Type, Key and its Target. Once you click Apply and save, it
will be added in your service.
Example:
In this example we are trying
to find the details of an employee which belongs to IT department through
XQuery mediator.
Define
XQuery:
I am giving the XQuery key
name is “GetEmployeeDetail_XQ” and also giving its path resides in conf directory.
<localEntry
key="GetEmployeeDetail_XQ"
src="file:repository/conf/employee/resources/xquery/GetEmployeeDetail.xq"/>
Call
XQuery in Synapse:
<xquery
key="GetEmployeeDetail_XQ">
<variable name="Department"
action="set" value="IT"/>
</xquery>
In this XQuery we are also
passing one variable and value of this variable is “IT”.
XQuery:
xquery version "1.0";
declare namespace swj="http://shriwithjava.blogspot.co.nz/";
declare
variable $Department as xs:string external;
declare variable $EmployeeName :=
$EmployeeDetailsResponse/swj:EmployeeDetails[swj:DepartmentNumber=$Department]/swj:EmployeeName/text();
declare variable $EmployeeDesignation :=
$EmployeeDetailsResponse/swj:EmployeeDetails[swj:DepartmentNumber=$Department]/swj:EmployeeDesignation/text();
declare variable $EmployeeAddress :=
$EmployeeDetailsResponse/swj:EmployeeDetails[swj:DepartmentNumber=$Department]/swj:EmployeeAddress/text();
declare variable $EmployeePhone :=
$EmployeeDetailsResponse/swj:EmployeeDetails[swj:DepartmentNumber=$Department]/swj:EmployeePhone/text();
<EMPLOYEE_DETAILS_RESPONSE>
<EMP_NAME>{$EmployeeName}</EMP_NAME>
<EMP_DESG>{$EmployeeDesignation}</EMP_DESG>
<EMP_ADD>{$EmployeeAddress}</EMP_ADD>
<EMP_PHONE>{$EmployeePhone}</EMP_PHONE>
</EMPLOYEE_DETAILS_RESPONSE>
Retrieve
details in Synapse:
From the below Xpath
expression we can get the value of Employee belongs to IT department from the
XQuery, we have transformed.
<property name="EmployeeName"
action="set"
expression="//EMPLOYEE_DETAILS_RESPONSE/EMP_NAME/text()"/>
<property
name="EmployeeDesignation" action="set"
expression="//EMPLOYEE_DETAILS_RESPONSE/EMP_DESG/text()"/>
<property name="EmployeeAddress"
action="set"
expression="//EMPLOYEE_DETAILS_RESPONSE/EMP_ADD/text()"/>
<property name="EmployeePhone"
action="set"
expression="//EMPLOYEE_DETAILS_RESPONSE/EMP_PHONE/text()"/>