Showing posts with label Azure Integrated Solution. Show all posts

Tuesday, May 9, 2023

Azure Application Gateway with APIM Internal Mode: Set Up Part 3 (Exposing Developer Portal on Internet and using path-based routing for external API in Application Gateway)


We are going to change only the Developer Portal details so that we can access it through Application Gateway from the Internet. No change is required on API Manger Gateway as we have tested that from the Application Gateway.

There is an issue that we cannot use the same RootCA certificate for the Gateway and Developer Portal as one RootCA can cater to only one backend. We must change the RootCA certificate for the Developer Portal so that we can expose it. So, we will keep the old RootCA certificate for the Gateway and create a new RootCA and SSL cert for the Developer Portal, but we need to make sure that we don’t change the FQDN which is devportal.demo.com as we have used the same name in Private DNS Zone.

Create a new RootCA and SSL certificate:

  • Let’s follow the same process I used in the first part of the blog.

C:\Work\study\APIM\demo\portal>openssl req -x509 -newkey rsa:4096 -keyout portal.key -out portal.crt -days 365 -nodes
...+.+..+...+....+.....+...+....+++++++++++++++++++++++++++++++++++++++++++++*.+......+............+........+...+....+++++++++++++++++++++++++++++++++++++++++++++*..+....+...+...+...+.....+.........+...........................+....+..+..........+.........+.....+...+.+.....+.........+...+..........+........+......................+.....+++++
-----
You are about to be asked to enter information that will be incorporated
into your certificate request.
What you are about to enter is what is called a Distinguished Name or a DN.
There are quite a few fields but you can leave some blank
For some fields there will be a default value,
If you enter '.', the field will be left blank.
-----
Country Name (2 letter code) [AU]:NZ
State or Province Name (full name) [Some-State]:Wellington
Locality Name (eg, city) []:Wellington
Organization Name (eg, company) [Internet Widgits Pty Ltd]:student
Organizational Unit Name (eg, section) []:student
Common Name (e.g. server FQDN or YOUR name) []:fabrikamportal.com
Email Address []:

C:\Work\study\APIM\demo\portal>openssl pkcs12 -export -in portal.crt -inkey portal.key -out portal.pfx
Enter Export Password:
Verifying - Enter Export Password:

C:\Work\study\APIM\demo\portal>openssl req -newkey rsa:4096 -out demo.csr -keyout demo.key -nodes
...+....+..+.............+..+..........+...+.....+.+.....+.+........+.+............+....................+...+++++++++++++++++++++++++++++++++++++++++++++*...+....+.....+.+..+...+....+...+...+...+..+...+......+...+.+..+.......+......+..+.......+.....+...+..........++++++++++++++++++++
-----
You are about to be asked to enter information that will be incorporated
into your certificate request.
What you are about to enter is what is called a Distinguished Name or a DN.
There are quite a few fields but you can leave some blank
For some fields there will be a default value,
If you enter '.', the field will be left blank.
-----
Country Name (2 letter code) [AU]:NZ
State or Province Name (full name) [Some-State]:Wellington
Locality Name (eg, city) []:Wellington
Organization Name (eg, company) [Internet Widgits Pty Ltd]:student
Organizational Unit Name (eg, section) []:student
Common Name (e.g. server FQDN or YOUR name) []:devportal.demo.com
Email Address []:

Please enter the following 'extra' attributes
to be sent with your certificate request
A challenge password []:password
An optional company name []:

C:\Work\study\APIM\demo\portal>openssl x509 -req -in demo.csr -CA portal.crt -CAkey portal.key -CAcreateserial -out demo.crt -days 365
Certificate request self-signature ok
subject=C = NZ, ST = Wellington, L = Wellington, O = student, OU = student, CN = devportal.demo.com

C:\Work\study\APIM\demo\portal>openssl pkcs12 -export -in demo.crt -inkey demo.key -out demo.pfx
Enter Export Password:
Verifying - Enter Export Password:

C:\Work\study\APIM\demo\portal>


    Commands:

  • openssl req -x509 -newkey rsa:4096 -keyout portal.key -out portal.crt -days 365 -nodes
  • openssl pkcs12 -export -in portal.crt -inkey portal.key -out portal.pfx
  • openssl req -newkey rsa:4096 -out demo.csr -keyout demo.key -nodes
  • openssl x509 -req -in demo.csr -CA portal.crt -CAkey portal.key -CAcreateserial -out demo.crt -days 365
  • openssl pkcs12 -export -in demo.crt -inkey demo.key -out demo.pfx

Update the new SSL cert for the custom domain in the API Manager instance.

  • Follow the same process I did in the first part


  • Click the save button, it will take some time to get updated once done we will test the Developer Portal from the VM

  • The certificate is saved now, let’s try to access the developer portal from the Virtual Machine.


All looking good from the VM, and we can access the developer portal after changing the certificate.

Open Application Gateway and add a new Listener for Developer Portal

Create a new listener for the portal with the below details, I am using port 80 to keep things simple


  • Click on save
  • Update the backend pool with the below details and make sure you use devportal.demo.com on your FQDN which we configured


Add Backend Setting:

Add a backend setting like the below details


  • Change the certificate extension from .crt to .cer and upload it. This should be RootCA cert we just created for the developer portal

Your setting should be similar below


Add Rule:

  • Add a new Rule for the Developer Portal
  • Select PortalListner


  • And update the Backend target and Backend Settings

  • Click Save.

If all good, then you should be able to see your developer portal exposed on http port 80 over public IP address, let’s test this out


The developer portal is now exposed successfully.

Your Backend Health must be healthy as mentioned below.


Expose External APIs using path-based routing in Application Gateway.

I will be creating a separate blog for path-based routing, but at a high level what we do, I have written here

We have everything we need now, to secure internal and external API we can make use of path-based routing. For example, we have 2 below APIs running on VM and we want to expose only one API to an external vendor and want to keep one for internal.

·       https://<host_name>/api/produc

·       https://<host_name>/api/employee

We must create an API proxy for each service on API Manager with the below URL


API Management Proxies:

·       https://<host_name>/internal/api/product

·       https://<host_name>/external/api/employee


We can now create path-based routing for external API

Open Application Gateway

  • Delete the existing External Rule
  • Add new External Rule


  • Add path-based setting


  • Give /external/* value in the Path which makes sure that all the API which has the external keyword in the URL can be accessed from Application Gateway


  • Click add


  • We can now provide details of this API to external customers and publish it through Developer Portal


Thursday, August 5, 2021

Move, Copy and Delete blob with Azure Logic App


Recently I have been working with the blob storage where in many cases I had to move, copy, and delete the blob from the storage after performing some actions on those blobs. In this blog I am going to talk about how to perform copy, move, delete operation on Azure blob storage from the Logic APP.


This is quite simple to perform these operations as Logic App provides these inbuild function so all we need to do is to call relevant function for a particular requirement.


Requirement: In my requirement I had to read the file content from the boob storage and after reading it I had to move it to different blob storage and in some scenario, I had to delete it permanently from the blob storage. So, let’s see how we can achieve it.


Create A Logic APP:

This first step is obviously creating a Logic App. If you want to see how to create from scratch, then please follow my previous blog.


You can use any trigger as this in totally independent functionality.


Create a Connection:

After creating a logic app and trigger, you have to make a connection to the Azure blob (if you dint have already). You need to provide your credentials to create connection.


Azure Blob inbuilt function:

When you choose “Azure Blob” as “+ New Step” and after creating a connection with blob, you can see multiple option Azure Logic App provides for use to use. You can see in below screenshot where you can choose Create Blob, Copy blob, delete blob etc.


Copy Blob:

Copying blob functionality can be achieved by specifying Source URL and Destination URL. In below example I have given dynamic values as this is the common pattern, we use otherwise you can use a static one.


In below screenshot you can see how the dynamic URL is generated after running the Logic APP. This is something we can also provide as static value.


Delete Blob:

This is also one of the inbuilt functions provided by the logic app to play with Azure blob. Simply use the Delete blob from the option and provide the blob path which you want to delete. Below is the dynamic one.


Dynamic one will be changed to below URL if we run this app.


Move Blob from one to another folder:

There is no functionality like that but what we can do to achieve it to simply copy first from source to destination folder and then perform delete operation in the source folder to delete the blob

Sunday, July 11, 2021

Create a soap custom connector and call it from azure logic app


Now a days REST services are more popular but time to time we have to face SOAP services and required to call them in our existing flow/API/process. At the moment, Logic APP doesn’t provide SOAP based HTTP trigger, but we can easily call it from Logic APP.

In order to call SOAP service, we have to create SOAP custom Logic APP connector, once we publish the connector, we can call it from the Logic APP.


SOAP Service:

In this example, we are going to call below SOAP service, I found it from internet, you can use your own.


SOAP URL:

http://www.thomas-bayer.com/axis2/services/BLZService?wsdl


Use 10000000 value in request parameter to get expected response as mentioned in above screenshot.


Create a Resource:

  • In Azure portal create “Logic Apps Custom Connector


  • Give the required details to create custom connector, I have given here “soap-proxy


  • Hit Review + Create. Hit create again once asked.


  • Click Edit in above screen and use below details:


  • API Endpoint: use SOAP
  • Call Mode: SOAP to REST
  • Import Mode: WSDL URL (you can use WSDL file as well)
  • Click Import: it will automatically fill the HOST details


  • Click security
  • Authentication Type – you can use none or basic authentication, I have left it black as not required to call this SOAP service


  • Click on Definition
  • Fill some details in summary and description field. 


  • Click on update connector. Once saved, your connector is ready to use in Logic APP.


Create a Logic APP:

  • Create a Logic APP, I have created with name of “soap-custom-connector
  • Choose a HTTP trigger
  • In Request Body JSON Schema – create a schema from sample JSON


Sample JSON to create Schema:


{

    "bankcode":"11"

}


  •  Use method as POST


  • Click Next and use “Custom” in menu. You can see our new connector is visible here, what we just created “soap-proxy


  •  Select SOAP test call in from below screen


  • Select “blz” from the parameter


  •  Select bankcode as dynamic parameter


  • Add “Request” component and set dynamic response from SOAP call, set header and HTTP response code as mentioned below


  • Click save and try testing it. We will see a HTTP request URL generated for us as soon as we save it.


  •  You can run it in your favorite API testing tool, I am using SOAP UI.


  •  You can also see it in your Logic APP “Run History


Azure storage blob event trigger with filter in logic app


There might be a scenario where you want to filter out your event trigger based on some condition. I am going to take simple scenario and also using our existing logic app that I created in last blog.


Scenario: 


When you have multiple blob storage but want to trigger an event only from one container. This won’t impact any other container.


Open the existing logic app “event-based-logic-app” created in last blog.


Click on “Add new parameter” and choose “prefix filter


Provide “/blobServices/default/containers/<container_name>/blobs” parameter


Save your logic app and try uploading a file in “toprocess” container. You can see the logic app has been triggered but if you upload file in any other container, it won’t trigger.


Azure storage blob event trigger in logic app


Now a day’s event-based processing is very popular as it keeps the system loosely coupled and it process the data on real time. as soon as one process is completed, we can setup an event to trigger another process. We don’t have to wait/ call the API or process to check the status of previous step.


Scenario:


In below scenario, we are trying to trigger an event as soon as we upload a file to a storage container. So that we can take the data of the blob and process that data accordingly.


In above flow diagram we have one storage account a container in it called “toprocess”. This will trigger an event trough event grid to execute the logic app named “event-based-logic-app”.


Let’s create a event based logic app:


  • Hit create once asked.


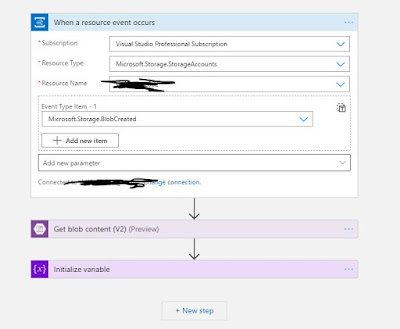
  • Choose “When an Event Grid resource event occurs” template
  • Try login with your account, it will create a API connection, in my case I am already logged-in.


  • Choose your subscription
  • Resource Type as “Microsoft.Storage.StorageAccounts”
  • Resource name as “Your storage account” where container has been created.
  • Event Type Item – 1 - Microsoft.Storage.BlobCreated


  • Click Next:
  • Choose Azure Blob Storage:


  • In next step choose “Get blob content” and in blob text box use expression “uriPath(triggerBody()?['data'].url)


  • From the connection details it will populate “Storage account name”.
  • Blob – we have to use expression in order to get content from storage
  • Infer content type – default “Yes”


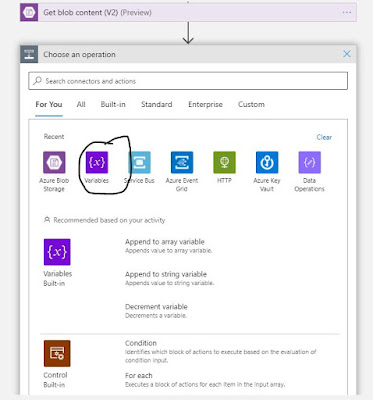
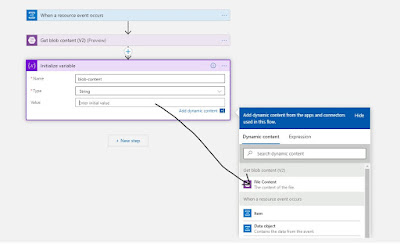
  • To verify the content, we can initialize a variable and store content value in there.


  • Choose “Initialize variable”


·       Name: blob-content

·       Type – String

·       Value – choose “File Content from Dynamic Content window”


  • Click save and try uploading a file in “toprocess” container to see its execution and file content in base64 encoded format.