This is one
of the famous design patterns we are going to set up. We will put API Manager
inside a virtual network so that we can secure our internal APIs. Since it is
going to be inside the virtual network, we can have all the connectivity inside
de Virtual network and On-Premise with the help of Express Route. In the API
world, we also need to expose our APIs outside of the network so that our
external vendor can connect with these APIs. To achieve that we will be putting
Application Gateway in front of API Manager and will expose only those APIs
which are required.
Architecture
Diagram:

Based on
the above architecture diagram, we will create an API inside the VM, and this
API will be treated as an internal API. We will put API Manager and Application
Gateway inside the virtual network. This is going to be a lengthy process so
make sure you have enough time to complete the setup.
If you are
working in the office and trying to set up, then grab a coffee.
If you are
working from home and setting this up for learning, then grab a few beers 😉
From step 1
to step 5 you can create resources parallelly then you need to wait for another
process to complete. Let’s get started…
Step 1: Create
an APIM instance with Developer SKU

Step 2:
Create a Virtual Machine for our backend
· Create a VM, this will be treated as
backend internal services for the APIM. When we create this VM it will give us
some other resources like interface, public IP, VM, Virtual Network, etc. We
will use the same virtual network for APIM. Let’s complete this task parallelly
while our APIM is getting ready

· On the network tab I am updating the
virtual network name and creating 3 subnets,
o
apim-vet
: virtual network name
o
backend-subnet
: subnet name
o
apim-subnet
: subnet name
o
app-gw-subnet
: subnet name
· We need 2 separate empty subnet one
for API Manager and another for Application Gateway, which is required.


· Click review and create and click
create.
Step 3: Create an API inside the VM:
Let’s create
a dummy API inside backendvm and test it. Same API we will call from API
Manager so that we can test our API manager in internal mode and later same API
will be called from the application gateway to test end to end
· Install IIS server
· Put a json file inside “C:\inetpub\wwwroot\test”

· I have installed the Postman inside
the VM.
· I have given a test as mentioned
below our API is working as expected
· We will create a proxy of this API
in API manager.

Step 4: Create
a network security group for API Manager:


· Add Inbound Rules
· Add any internet connection to reach
ports 443 and 80 inside the virtual network

· Add API Management.AustraliaEast
(location for the API Manager) to reach to virtual network on port 3443

· Add one below outbound rule

These above
4 steps you can do while creating an API Management instance. Now wait if your
API Manager is not yet ready.
Once your
API Manager instance is ready it should be like the below. This should
currently have connectivity from the internet.

Step 5: Put
this API Manager in the virtual network:
· Go to Network and choose Internal
Virtual network and select “apim-vnet” and “apim-subnet” as mentioned
below.
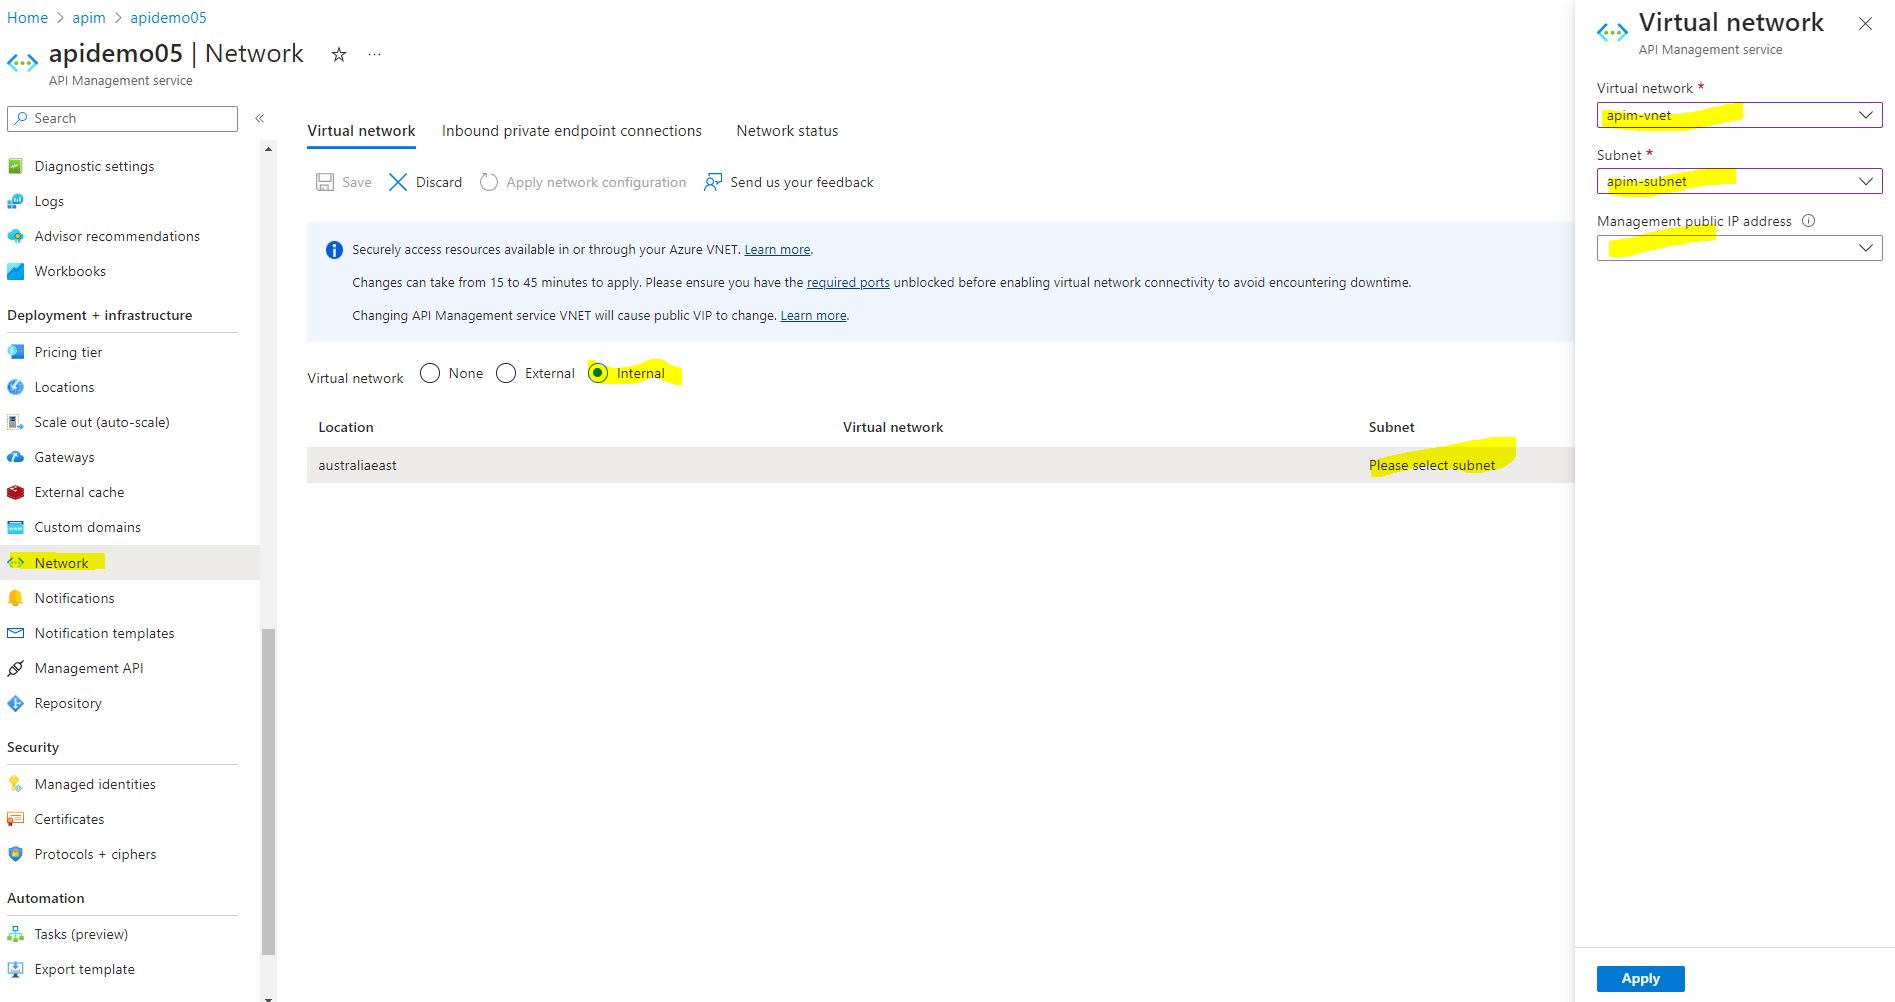
· Click apply and save it. It will again take some time to complete.

Execute the
below commands one by one. We are creating RootCA certificate and then creating
SSL certificate. Our SSL certificate is a wildcard certificate which is why we
have given its name *.demo.com
and RootCA certificate with the name fabrikam.com
· openssl req -x509 -newkey rsa:4096
-keyout fabrikam.key -out fabrikam.crt -days 365 -nodes
· openssl pkcs12 -export -in
fabrikam.crt -inkey fabrikam.key -out fabrikam.pfx
· openssl req -newkey rsa:4096 -out
demo.csr -keyout demo.key -nodes
· openssl x509 -req -in demo.csr -CA
fabrikam.crt -CAkey fabrikam.key -CAcreateserial -out demo.crt -days 365
· openssl pkcs12 -export -in demo.crt
-inkey demo.key -out demo.pfx
· if the password is asked while
creating the cert, I have given “password”
You will 2 certificates
one is for Root CA and another SSL certificate is signed by Root CA


The
complete step looks like this below:
C:\Work\study\APIM\demo>openssl req -x509 -newkey rsa:4096 -keyout fabrikam.key -out fabrikam.crt -days 365 -nodes

....+..+.......+...+..+..........+...........+....+.....+......+....+.....+......+.+...........+....+......+.....+....+.....+....+++++++++++++++++++++*..................+..+.......+..+....+..+.............+++++

-----

You are about to be asked to enter information that will be incorporated

into your certificate request.

What you are about to enter is what is called a Distinguished Name or a DN.

There are quite a few fields but you can leave some blank

For some fields there will be a default value,

If you enter '.', the field will be left blank.

-----

Country Name (2 letter code) [AU]:NZ

State or Province Name (full name) [Some-State]:Wellington

Locality Name (eg, city) []:Wellington

Organization Name (eg, company) [Internet Widgits Pty Ltd]:student

Organizational Unit Name (eg, section) []:student

Common Name (e.g. server FQDN or YOUR name) []:fabrikam.com

Email Address []:


C:\Work\study\APIM\demo>openssl pkcs12 -export -in fabrikam.crt -inkey fabrikam.key -out fabrikam.pfx

Enter Export Password:

Verifying - Enter Export Password:


C:\Work\study\APIM\demo>openssl req -newkey rsa:4096 -out demo.csr -keyout demo.key -nodes

..+.+...+..+++++++++++++++++

-----

You are about to be asked to enter information that will be incorporated

into your certificate request.

What you are about to enter is what is called a Distinguished Name or a DN.

There are quite a few fields but you can leave some blank

For some fields there will be a default value,

If you enter '.', the field will be left blank.

-----

Country Name (2 letter code) [AU]:NZ

State or Province Name (full name) [Some-State]:Wellington

Locality Name (eg, city) []:Wellington

Organization Name (eg, company) [Internet Widgits Pty Ltd]:student

Organizational Unit Name (eg, section) []:student

Common Name (e.g. server FQDN or YOUR name) []:*.demo.com

Email Address []:


Please enter the following 'extra' attributes

to be sent with your certificate request

A challenge password []:password

An optional company name []:


C:\Work\study\APIM\demo>openssl x509 -req -in demo.csr -CA fabrikam.crt -CAkey fabrikam.key -CAcreateserial -out demo.crt -days 365

Certificate request self-signature ok

subject=C = NZ, ST = Wellington, L = Wellington, O = student, OU = student, CN = *.demo.com


C:\Work\study\APIM\demo>openssl pkcs12 -export -in demo.crt -inkey demo.key -out demo.pfx

Enter Export Password:

Verifying - Enter Export Password:

· Change the extension of .crt to .cer for the RootCA certificate
· Below files are created

Step 7: Private DNS ZONE
Create a
private DNS with the “demo.com” name. This part is very important in terms
of its name because we have created certificates for the same demo.com
name. API Manager inside VNET can’t be reachable with private IP so we must
create a portal and gateway private DNS so that we can connect to it.
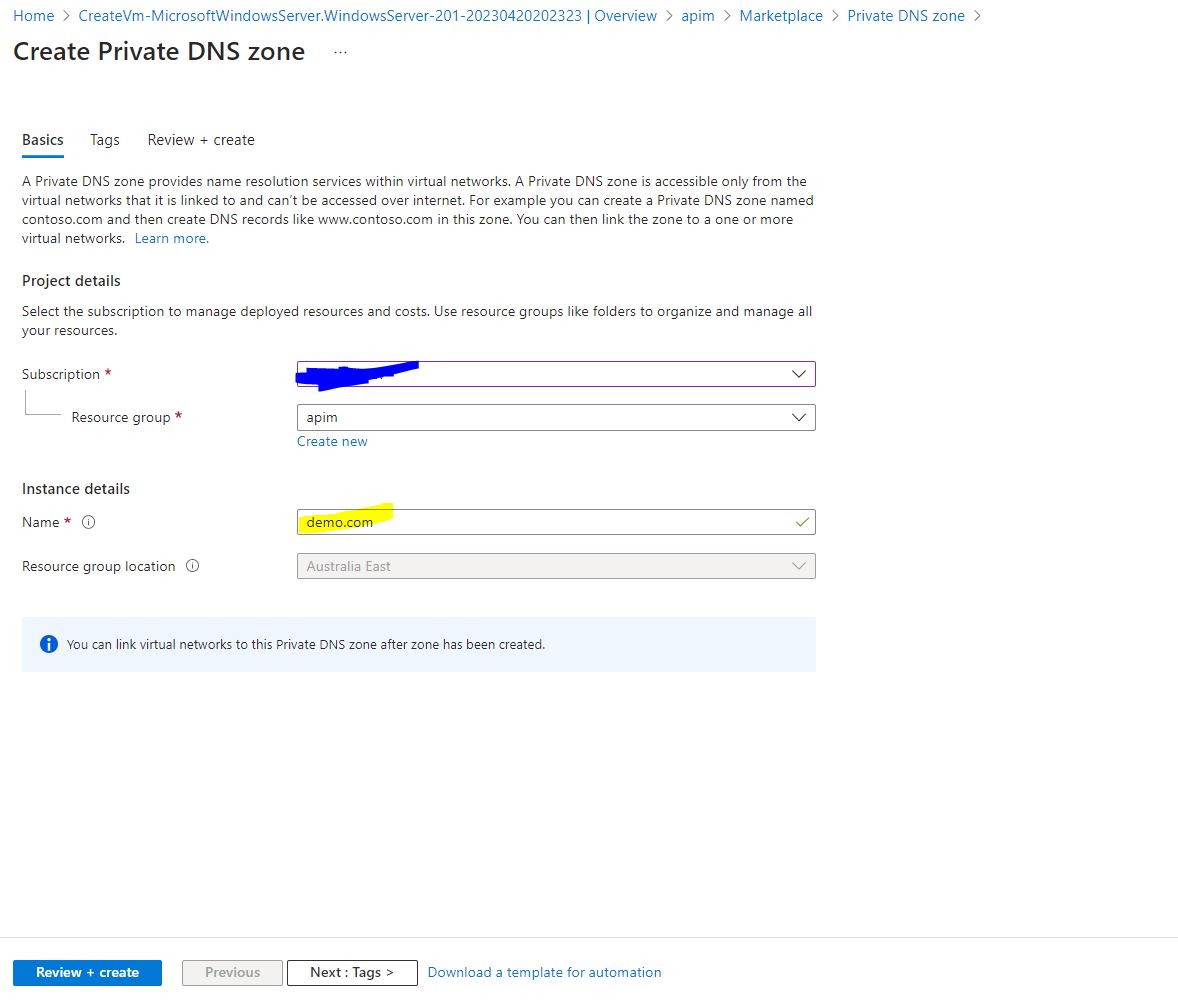
· Let’s create one for the API
gateway and another for the developer portal. We will access them
with this FQDN.
o
api.demo.com
– API gateway
o
devportal.demo.com – Developer portal

· Below is one for the developer
portal

· Click on the Virtual Network Link to
link apim-vnet with this private DNS Zone
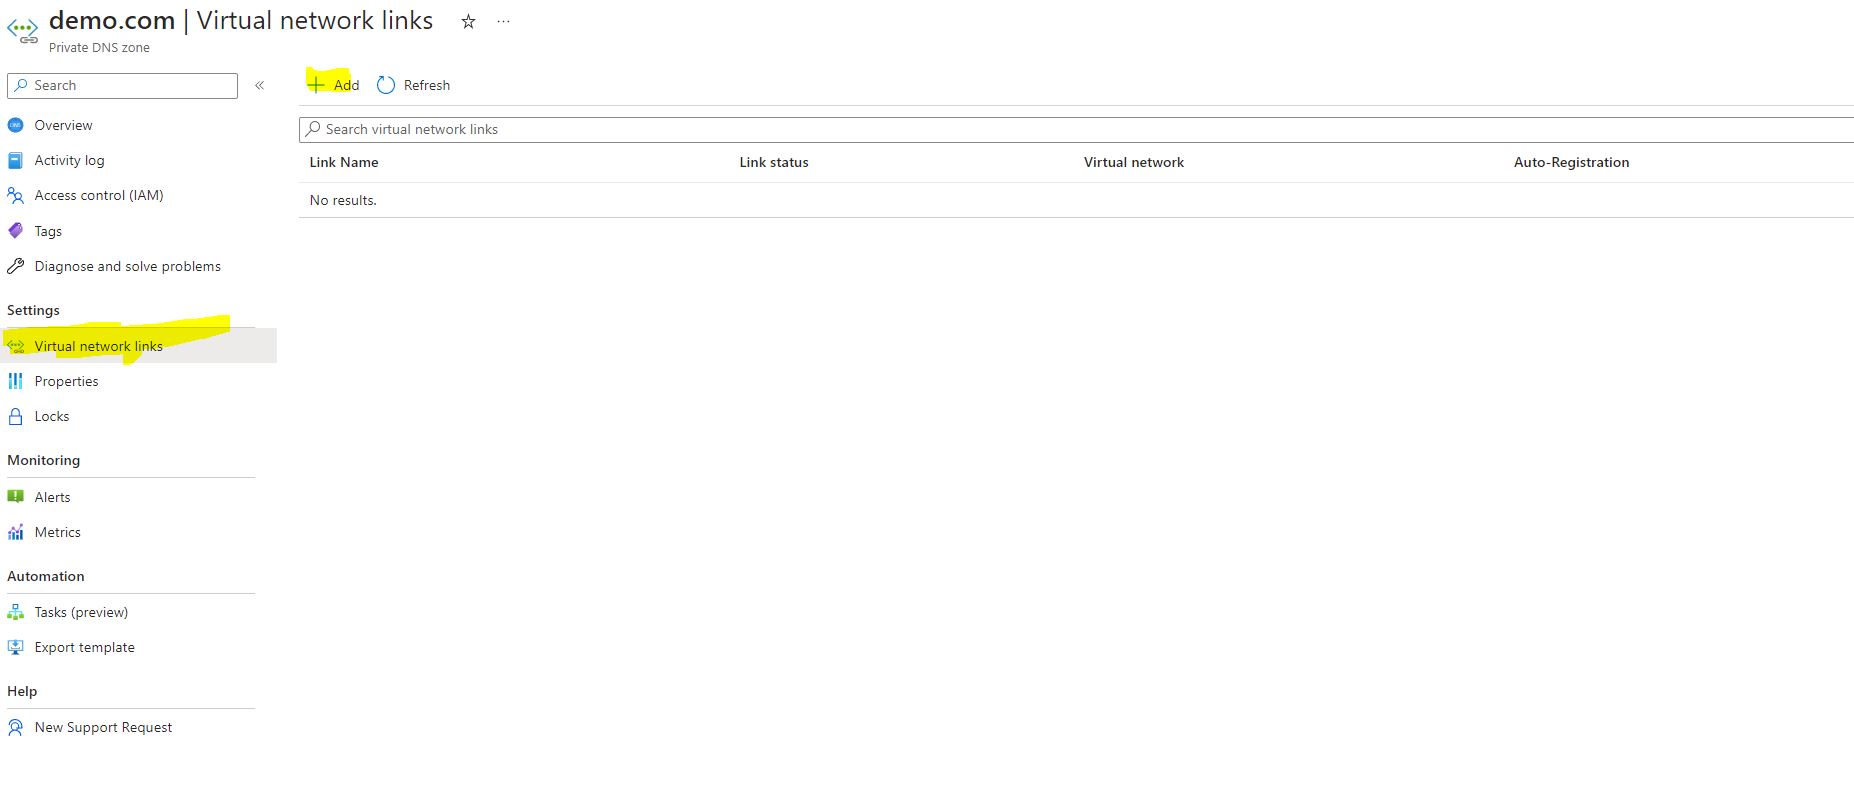
· Give any name you like, I have given
apim-vnet-link
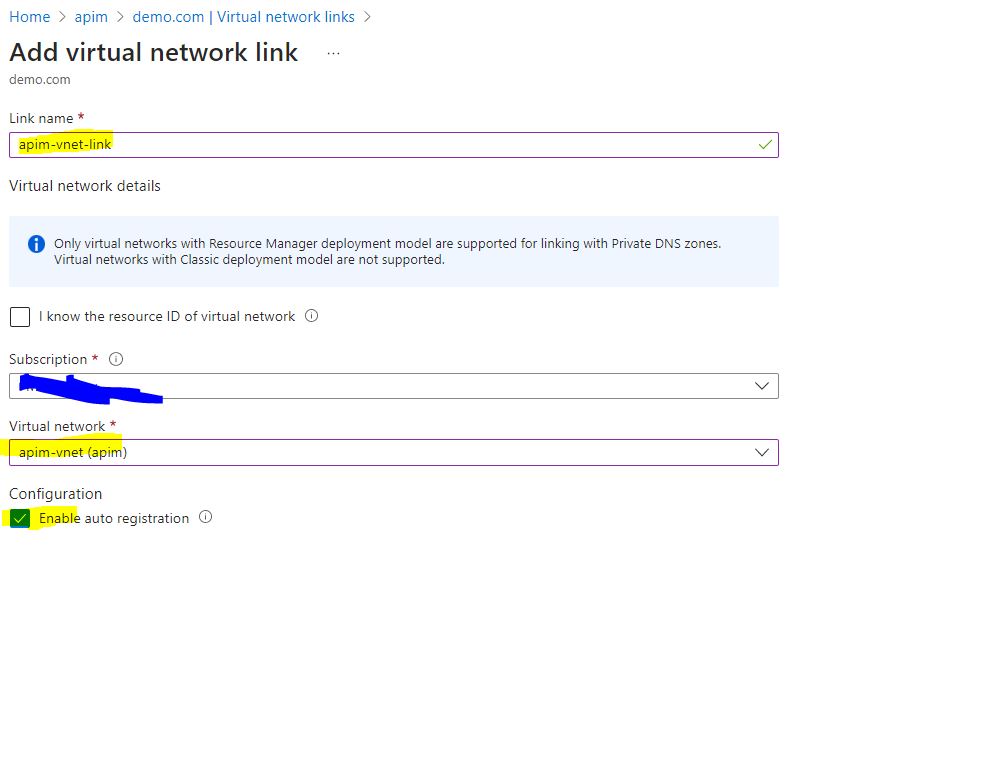
· Finally, it should look like the below
screenshot

Step 8: Update
Custom Domain in API Manager
The default
custom domain comes with it. We must add 2 custom domains one for the API
gateway and another for the developer portal. This domain name must
be the same as what we created in the private DNS zone and cert for that from an
open SSL script

· Create one for the Gateway and give
“api.demo.com” and upload the certificate in .pfx format. Password is password
(you can choose your own)

·
Create
one for the Developer Portal and give “devportal.demo.com” and upload
the certificate in .pfx format. Password is password

· Final custom domain, click save
again it will take some time

· Click on the save button, this will
take again some time
· If all is good, then you can see
your developer portal and Gateway URL will be changed to the new custom domain

Step 9: Create
an API in API Manager and point its backend to the backend VM’s API
· Click on the API menu and add an API
“Internal API”
· Backend is private IP with API URL
· Add base URL suffix
o
Product.json

· Add an operation with the below
details

· Click save. Since it is an internal
URL and we have given private IP as a backend. Let’s test this from Backend VM.
Step 10:
Testing:
· Login to VM
· Open “https://devportal.demo.com” URL in the VM browser, you will
see that you can reach the developer portal

· Test the API that we have created
(however this API is running in the same VM only, but the request is coming via
API Manager)

· This gives a successful result.
· This concludes that API Manager is
working in internal mode successfully
Our next
step is to add Application Gateway before the API manager so that we can also
reach from the Internet. Let’s complete
that in part 2 here.