Monday, July 15, 2024

HVR 05 - Setup HVR HUB with MySQL Database on Azure VM

You need to follow these steps to set up an HVR Hub with a MySQL database on an Azure VM.
Database, Agane, source, and destination details can be found in the previous blogs

Step 1: Create a VM on Azure

Ensure you have an Azure VM running Windows with administrative access.


Step 2: Install HVR HUB on VM

Download the HVR setup exe file


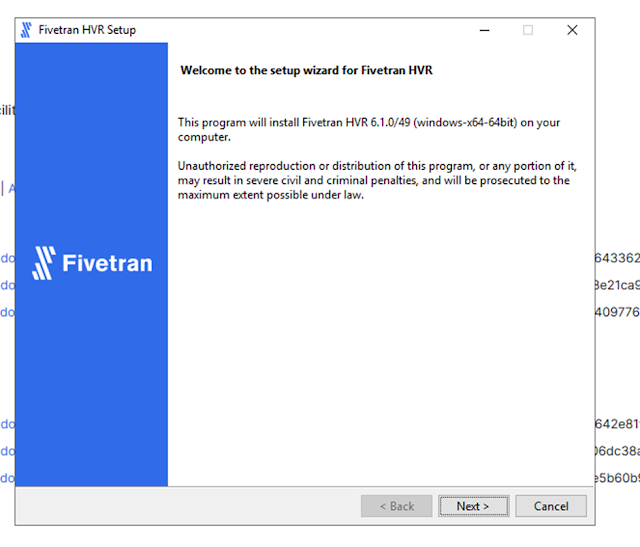
Install the HVR HUB on the Windows VM. 


Click next and choose HVR hub this time. 


Click "Next." The default port is 4340 for HTTP. If you want to use a certificate and run on HTTPS, the port will be 4341.


Click Next and choose “Local System Account”.

Click on the Check Box and Click Next to install the HVR Hub


Click "Finish" once everything is properly configured.


Open the inbound port on the VM to allow the HVR HUB to run on the browser.


Select "Inbound rules" and click on "Port."


Open ports 80 and 4340 for HTTP, and ports 443 and 4341 for HTTPS.


Give the name of the port config

Try opening the HVR hub using the VM's IP address on port 4341. If you see the screen below, then everything is set up correctly.


Step 3: Install HVR Repository


I have chosen the MySQL server for the HVR repository. HVR also supports other databases, so feel free to select any other supported database based on your preference.

I am creating a MySQL server on the Azure cloud.


Make sure to allow the port and IP address to access this MySQL server from your machine or any other location where you intend to manage this HVR repository.

I have installed MySQL Workbench to test the data.


Step 4: Connect HVR HUB to the MYSQL Repository


Open the HVR hub in your browser and select MySQL as the HVR repository server as described below. 

Enter the username, hostname, port, and password, and attempt to establish the connection.


If you get the above error then go to Azure Portal and change the “require_secure_transport” setting from OFF to ON.


Save the setting.


Now try connecting that again, you should be able to connect it successfully.


Upload the License: 

You need a valid license to use HVR. Once you have the license, simply upload it as instructed below.


Verify the license and finish the setup. You'll need to provide the HVR HUB username and password to log in from the browse.


After completing the setup, you should be able to view multiple tables created by the HVR HUB. These tables should be managed exclusively through the HVR HUB UI.


If you see the screen below, you are ready to proceed with creating locations.


Thursday, July 4, 2024

Fivetran HVR 04 - Setup Destination Snowflake Database


Creating a Snowflake account and setting up a database involves several steps, including signing up for the service, configuring your environment, and creating the necessary database objects. Here's a step-by-step guide to get you started:

Step 1: Sign Up for a Snowflake Account


  • Visit the Snowflake Website:
    • Go to the Snowflake sign-up page.

  • Fill in Your Details:
    • Provide your name, company, email address, and other required information.
    • Choose your cloud provider (AWS, Azure, or Google Cloud) and region where you want your Snowflake instance to be hosted.

  • Complete the Registration:

    • Submit the form and follow the instructions in the confirmation email you receive to activate your account.


Step 2: Log In to Your Snowflake Account


  • Access the Snowflake Console:
    • After activation, log in to your Snowflake account using the URL provided in the confirmation email.
    • The URL typically looks like https://<account_name>.snowflakecomputing.com.


Step 3: Create a Database


  • Open the Snowflake Web Interface:
    • Once logged in, navigate to the Snowflake web interface.
  • Navigate to Databases:
    • In the top menu, click on Databases to open the databases section.
  • Create a New Database:
    • Click on the Create button to open the Create Database dialog.
    • Enter the name for your new database and provide any optional comments.
    • Click Finish to create the database.


Alternatively, you can use SQL to create a database:

CREATE DATABASE HVR_DESTINATION;


Wednesday, July 3, 2024

Fivetran HVR 03 - Setup HVR Agent on Source Server


HVR Agent Setup


Fivetran HVR (High Volume Replication) is a data integration and replication technology that focuses on real-time data movement, synchronization, and transformation across diverse environments, particularly those involving large volumes of data. Here's a detailed look at its components and functionality:


To install the HVR agent on a Windows VM, follow these steps:

Prerequisites:


  • Windows VM: Ensure you have a Windows VM with administrative access.
  • HVR Software: Obtain the HVR software package from the Fivetran HVR support portal or from your Fivetran representative.


We will use the same server where we installed the Postgres database in our previous blog.


Steps to Install HVR Agent:

  • Download the HVR Software:
  • Extract the Package:
    • Extract the contents of the downloaded package to a directory on your VM.
  • Install HVR:
    • Open a command prompt with administrative privileges.
    • Navigate to the directory where you extracted the HVR package.
    • Run the installer by executing the following command:
    • Follow the on-screen instructions to complete the installation process. You may be prompted to choose an installation directory and to agree to the license terms


Click on Next


Make sure you choose HVR Agent as mentioned above screenshot. Click Next


Choose Local System account. (You can also choose specific user as well but while connecting it from the HVR Hub you have to use that.) Click Next


Check the Environment box, and click Next.


Click on Finish.
You should be able to see that service running on the 4343 default HVR port.


Make sure you open the port from Azure NSG VM so that HVR Hub can access this Agent on the 4343 port.


Tuesday, July 2, 2024

Fivetran HVR 02 (Install Portgres on a Azure windows VM) - Source Setup Part 1


Step 1: Create an Azure Windows VM


Log in to Azure Portal:


Configure the VM:


  • Choose an appropriate size and image (Windows Server).
  • Configure the instance details, including the resource group, VM name, region, and size.
  • Set up an administrator account (username and password).

Review and Create:


  • Review the settings and click "Create" to deploy the VM. (you can update the networking rule while creating the VM or do it later as mentioned in the next step)

Set up Networking:


  • Configure the networking settings, ensuring that the VM has a public IP address.
  • Open the necessary ports in the Network Security Group (NSG). You need to allow:
    • Port 3389 for RDP access.
    • Port 5432 for PostgreSQL.


Step 2: Install PostgreSQL on the Windows VM


RDP into the VM:


  • Use Remote Desktop to connect to the VM.
  • Open the Remote Desktop Connection application and enter the public IP address of the VM.
  • Log in with the administrator credentials.

Download PostgreSQL Installer:


  • Open a web browser on the VM and go to the PostgreSQL download page: https://www.postgresql.org/download/windows/
  • Download the PostgreSQL installer.

Install PostgreSQL:


  • Run the installer and follow the installation steps.
  • During the installation, set a password for the PostgreSQL superuser (Postgres).
  • Complete the installation with the default settings.


Complete the Postgres setup on VM.


Step 3: Configure PostgreSQL to Allow Remote Connections


Edit the PostgreSQL configuration file:


  • Open the file Postgresql.conf located in the PostgreSQL data directory (default: C:\Program Files\PostgreSQL\<version>\data).
  • Find the line #listen_addresses = 'localhost' and change it to:
        listen_addresses = '*'


Edit the pg_hba.conf file:


  • Open the file pg_hba.conf located in the PostgreSQL data directory.
  • Add the following line to allow connections from any IP address (or specify a range for more security):
        host all all 0.0.0.0/0 md5


Restart PostgreSQL service:


  • Open the Services application from the Start menu.
  • Find the PostgreSQL service, right-click, and select "Restart".


Step 4: Configure Windows Firewall to Allow PostgreSQL Connections


Open Windows Firewall:


  • Open the Control Panel, go to System and Security, and then Windows Defender Firewall.


Create a New Inbound Rule:


  • Click on "Advanced settings" to open the Windows Firewall with Advanced Security window.
  • Right-click on "Inbound Rules" and select "New Rule".
  • Select "Port" and click "Next".
  • Select "TCP" and specify port 5432. Click "Next".
  • Allow the connection and click "Next".
  • Specify when the rule applies and click "Next".
  • Give the rule a name (e.g., "PostgreSQL") and click "Finish".


Add a rule 


I have allowed all the ports for the testing but ideally, you should only allow port 5432 for Postgres


Step 5: Access PostgreSQL from PGAdmin


Download and install PGAdmin:


  • Download and install PGAdmin on your client machine from https://www.pgadmin.org/download/.

Add a new server in PGAdmin:


  • Open PGAdmin and right-click on "Servers" to create a new server.
  • In the "General" tab, provide a name for the server.
  • In the "Connection" tab, enter the public IP address of your Azure VM, the username (Postgres), and the password you set earlier.
  • Click "Save" to connect to the PostgreSQL server on your Azure VM.
 

You should now be able to access and manage your PostgreSQL database on the Azure Windows VM using PGAdmin from your client machine.


Create a table and add some data into the table which will be used for the replication 


drop table cars;

CREATE TABLE Cars (
  brand VARCHAR(255),
  model VARCHAR(255),
  year INT,
creation_time TIMESTAMP
);

INSERT INTO cars( brand, model, year, creation_time) VALUES ('audi', 'a3', 2007, current_timestamp);
INSERT INTO cars( brand, model, year, creation_time) VALUES ('bmw', 'b1', 2012, current_timestamp);
INSERT INTO cars( brand, model, year, creation_time) VALUES ('merc', 'a4', 2107, current_timestamp);

select * from cars;


Fivetran HVR 01 - Introduction


Fivetran HVR (High Volume Replication) is a data integration and replication technology designed for real-time data movement, synchronization, and transformation across various environments, especially those handling large volumes of data. Here’s an in-depth overview of its components and functionality:


Key Features and Capabilities:


  • Real-Time  Data Replication:

    • HVR enables real-time data replication between source and target systems, ensuring that data changes are reflected almost instantaneously.

  • High Volume Data Handling:

    • It is designed to handle large volumes of data efficiently, making it suitable for enterprises with substantial data throughput requirements.

  • Change Data Capture (CDC):

    • HVR incorporates CDC to capture and replicate only the data that has changed in the source system, rather than performing full data loads. This increases efficiency and reduces latency.
  • Support for Diverse Environments:
    • It supports a wide range of databases, data warehouses, and cloud platforms, providing flexibility in terms of data sources and destinations.
  • Data Transformation:
    • HVR includes capabilities for transforming data during the replication process, allowing for data cleaning, enrichment, and formatting as it moves between systems.
  • Minimal Latency:
    • By capturing and replicating changes in real-time, HVR ensures minimal latency between data updates in the source and target systems.


Use Cases:


  • Database Migration:
    • HVR is often used to facilitate database migrations by ensuring continuous data synchronization between old and new systems until the migration is complete.
  • Data Warehousing:
    • Enterprises use HVR to feed data warehouses with real-time updates from transactional systems, ensuring that analytics and reporting are based on the latest information.
  • Disaster Recovery:
    • By replicating data to secondary systems in real-time, HVR supports disaster recovery strategies, ensuring data availability and resilience.

Fivetran's Integration:

Fivetran's acquisition of HVR enhanced its data integration platform by adding robust real-time data replication capabilities. This allows Fivetran to offer a comprehensive solution that combines automated data extraction, loading, and transformation with high-volume, real-time replication, making it a powerful tool for enterprises looking to streamline and scale their data operations.

In summary, Fivetran HVR is a robust solution for enterprises requiring efficient, real-time data replication and transformation across various systems, particularly in high-volume environments.