Thursday, February 23, 2023

Azure storage event trigger with user managed identity arm template


Recently I was working on one of the event-based solution where I had to trigger a logic app when a file is put on the storage account. It all looked fine when I was doing it manually on the portal but when I had to promote it to higher environment through the pipeline, I faced one issue. The issue was basically to find the dynamic URL of the Logic App. To get dynamic URL of the HTTP logic app is fine and you can get that with the below piece of code.


Get HTTP Logic APP URL

"url": "[substring(listCallbackUrl(resourceId(parameters('ResourceGroup'), 'Microsoft.Logic/workflows/triggers', parameters('LogicApps'), 'manual'), '2016-10-01').basePath,0,add(10,indexOf(listCallbackUrl(resourceId(parameters('ResourceGroup'), 'Microsoft.Logic/workflows/triggers', parameters('LogicApps'), 'manual'), '2016-10-01').basePath,'/triggers/')))]"


But I was struggling to get below URL through ARM template.


I have created a template which creates user-based managed identity Logic APP and will be triggered as soon as I put a file into the storage account.

So, before we run this ARM template, lets create a user managed identity and the storage account.

I have created a resource group and 2 resources inside it.

·       Resource Group            : event-trigger-logicapp

·       User Managed Identity   : event-test-identity

·       Storage Account           : eventtriggerstorage01


Important: Give contributor role to user managed identity to subscription level.


Now create a new "Custom Template Deployment" resource in event-trigger-logicapp resource group.


ARM Template: Make sure you update Logic App Name, Storage Account, Resource Group, Subscription ID and User Managed Identity values as highlighted.

{

    "$schema": "https://schema.management.azure.com/schemas/2019-04-01/deploymentTemplate.json#",

    "contentVersion": "1.0.0.0",

    "parameters": {

        "workflows_EventGridTest_name": {

            "defaultValue": "storage-event-logicapp",

            "type": "String"

        },

        "connections_azureeventgrid_name": {

            "defaultValue": "azureeventgrid",

            "type": "String"

        },

        "storageAccounts_storageaccountlogica_externalid": {

            "defaultValue": "/subscriptions/7bbce658-682f-417d-88f6-810b6fb20f4d/resourceGroups/event-trigger-logicapp/providers/Microsoft.Storage/storageAccounts/eventtriggerstorage01",

            "type": "String"

        },

        "userAssignedIdentities_ManagedContributor_externalid": {

            "defaultValue": "/subscriptions/7bbce658-682f-417d-88f6-810b6fb20f4d/resourceGroups/event-trigger-logicapp/providers/Microsoft.ManagedIdentity/userAssignedIdentities/event-test-identity",

            "type": "String"

        }

    },

    "variables": {},

    "resources": [

        {

            "type": "Microsoft.Web/connections",

            "apiVersion": "2016-06-01",

            "name": "[parameters('connections_azureeventgrid_name')]",

            "location": "australiaeast",

            "kind": "V1",

            "properties": {

                "displayName": "test2",

                "statuses": [

                    {

                        "status": "Ready"

                    }

                ],

                "customParameterValues": {},

                "createdTime": "2023-02-01T03:49:55.8553087Z",

                "changedTime": "2023-02-01T03:49:55.8553087Z",

                "api": {

                    "name": "azureeventgrid",

                    "displayName": "Azure Event Grid",

                    "description": "Azure Event Grid is an eventing backplane that enables event based programing with pub/sub semantics and reliable distribution & delivery for all services in Azure as well as third parties.",

                    "iconUri": "https://connectoricons-prod.azureedge.net/releases/v1.0.1538/1.0.1538.2619/azureeventgrid/icon.png",

                    "brandColor": "#0072c6",

                    "id": "/subscriptions/7bbce658-682f-417d-88f6-810b6fb20f4d/providers/Microsoft.Web/locations/australiaeast/managedApis/azureeventgrid",

                    "type": "Microsoft.Web/locations/managedApis"

                },

                "parameterValueType": "Alternative",

                "testLinks": []

            }

        },

        {

            "type": "Microsoft.Logic/workflows",

            "apiVersion": "2017-07-01",

            "name": "[parameters('workflows_EventGridTest_name')]",

            "location": "australiaeast",

            "dependsOn": [

                "[resourceId('Microsoft.Web/connections', parameters('connections_azureeventgrid_name'))]"

            ],

            "identity": {

                "type": "UserAssigned",

                "userAssignedIdentities": {

                    "/subscriptions/7bbce658-682f-417d-88f6-810b6fb20f4d/resourceGroups/event-trigger-logicapp/providers/Microsoft.ManagedIdentity/userAssignedIdentities/event-test-identity": {}

                }

            },

            "properties": {

                "state": "Enabled",

                "definition": {

                    "$schema": "https://schema.management.azure.com/providers/Microsoft.Logic/schemas/2016-06-01/workflowdefinition.json#",

                    "contentVersion": "1.0.0.0",

                    "parameters": {

                        "$connections": {

                            "defaultValue": {},

                            "type": "Object"

                        }

                    },

                    "triggers": {

                        "When_a_resource_event_occurs": {

                            "splitOn": "@triggerBody()",

                            "type": "ApiConnectionWebhook",

                            "inputs": {

                                "body": {

                                    "properties": {

                                        "destination": {

                                            "endpointType": "webhook",

                                            "properties": {

                                                "endpointUrl": "@{listCallbackUrl()}"

                                            }

                                        },

                                        "filter": {

                                            "includedEventTypes": [

                                                "Microsoft.Storage.BlobCreated"

                                            ]

                                        },

                                        "topic": "[parameters('storageAccounts_storageaccountlogica_externalid')]"

                                    }

                                },

                                "host": {

                                    "connection": {

                                        "name": "@parameters('$connections')['azureeventgrid_1']['connectionId']"

                                    }

                                },

                                "path": "/subscriptions/@{encodeURIComponent('7bbce658-682f-417d-88f6-810b6fb20f4d')}/providers/@{encodeURIComponent('Microsoft.Storage.StorageAccounts')}/resource/eventSubscriptions",

                                "queries": {

                                    "x-ms-api-version": "2017-06-15-preview"

                                }

                            }

                        }

                    },

                    "actions": {

                        "Compose": {

                            "runAfter": {},

                            "type": "Compose",

                            "inputs": 111

                        }

                    },

                    "outputs": {}

                },

                "parameters": {

                    "$connections": {

                        "value": {

                            "azureeventgrid_1": {

                                "connectionId": "[resourceId('Microsoft.Web/connections', parameters('connections_azureeventgrid_name'))]",

                                "connectionName": "azureeventgrid",

                                "connectionProperties": {

                                    "authentication": {

                                        "identity": "[parameters('userAssignedIdentities_ManagedContributor_externalid')]",

                                        "type": "ManagedServiceIdentity"

                                    }

                                },

                                "id": "/subscriptions/7bbce658-682f-417d-88f6-810b6fb20f4d/providers/Microsoft.Web/locations/australiaeast/managedApis/azureeventgrid"

                            }

                        }

                    }

                }

            }

        }

    ]

}


After a successful run, you should be below resources are created out of template deployment.


Let’s create a “toprocess” name container and put a file there.


You will notice that logic app has triggered.


If you look into the “Event Grid System Topic” a URL gets created automatically. This URL gets created internally so as per my understanding you can't get this URL through ARM similar to HTTP one. (I could be wrong though 😊)




Sunday, July 3, 2022

OAuth2.0 Security Function APP with Azure AD


When we create function app and put it on Azure cloud, they need to be secure. When it comes to security of Function Apps, there are few options like Azure AD, Function Level, put them in VNET, secure them through API Manager etc. In this blog we will see how we can secure our function using Azure AD OAuth 2.0.


We will be creating Azure App registration and Function App separately then will enable our function app to use Azure AD as an Identity provider.


Azure AD App Registration:

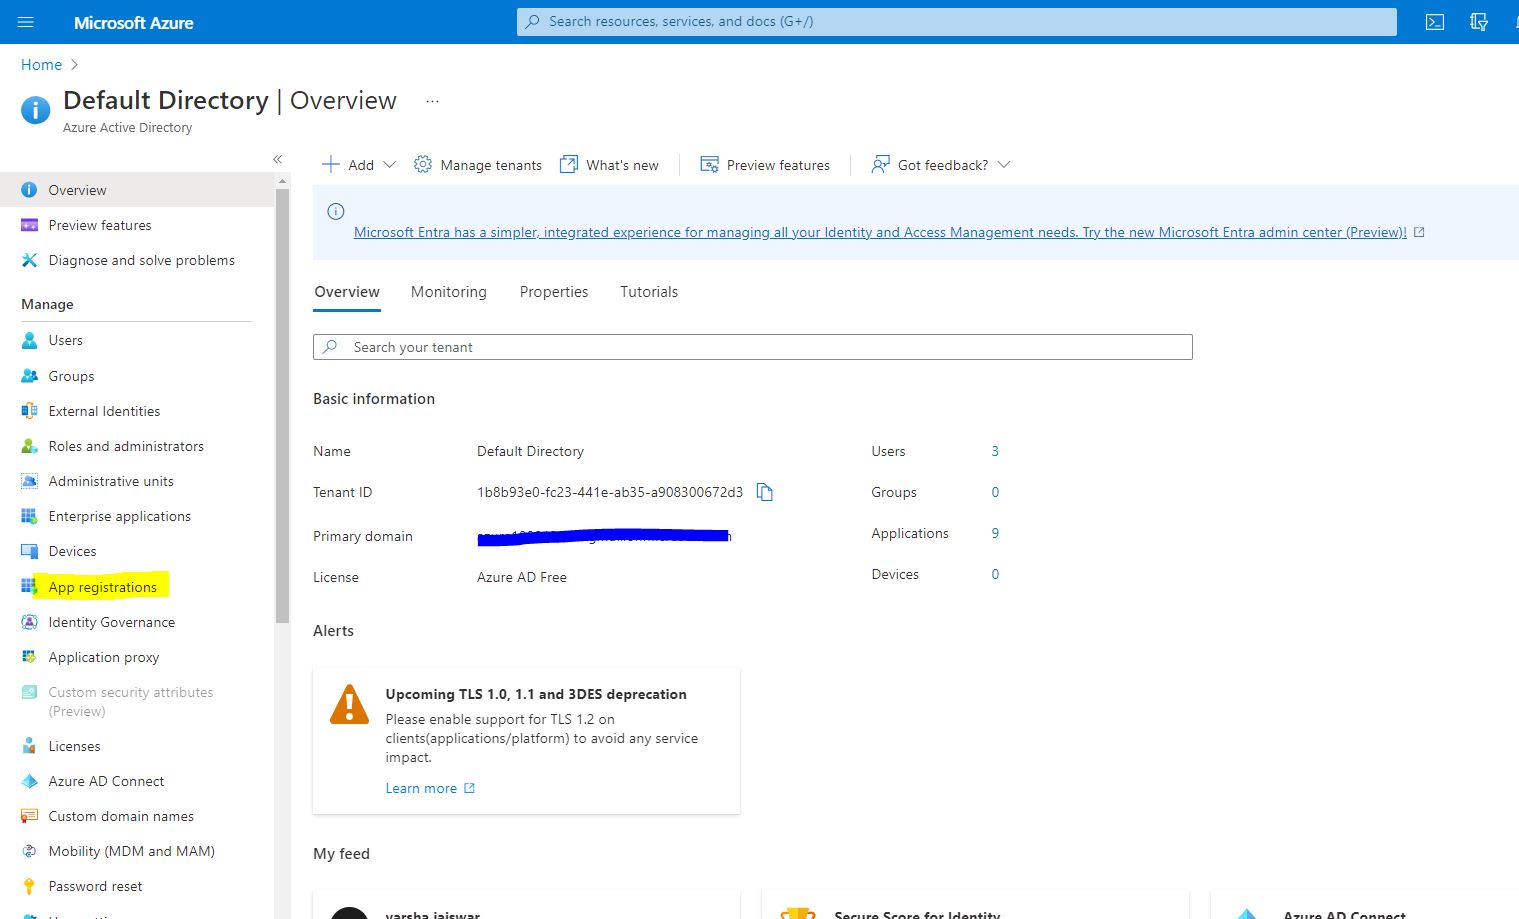
Open azure portal and click on Azure Active Directory, you should be able to see below screen.


Click on New Registration button as highlighted.


Register an app by providing a Name and supported account type. In my case I have given oauth-demo-fun-app name and chosen “Single Tenant”


Click on register to create app registration. An Application (Client) id will be generated.


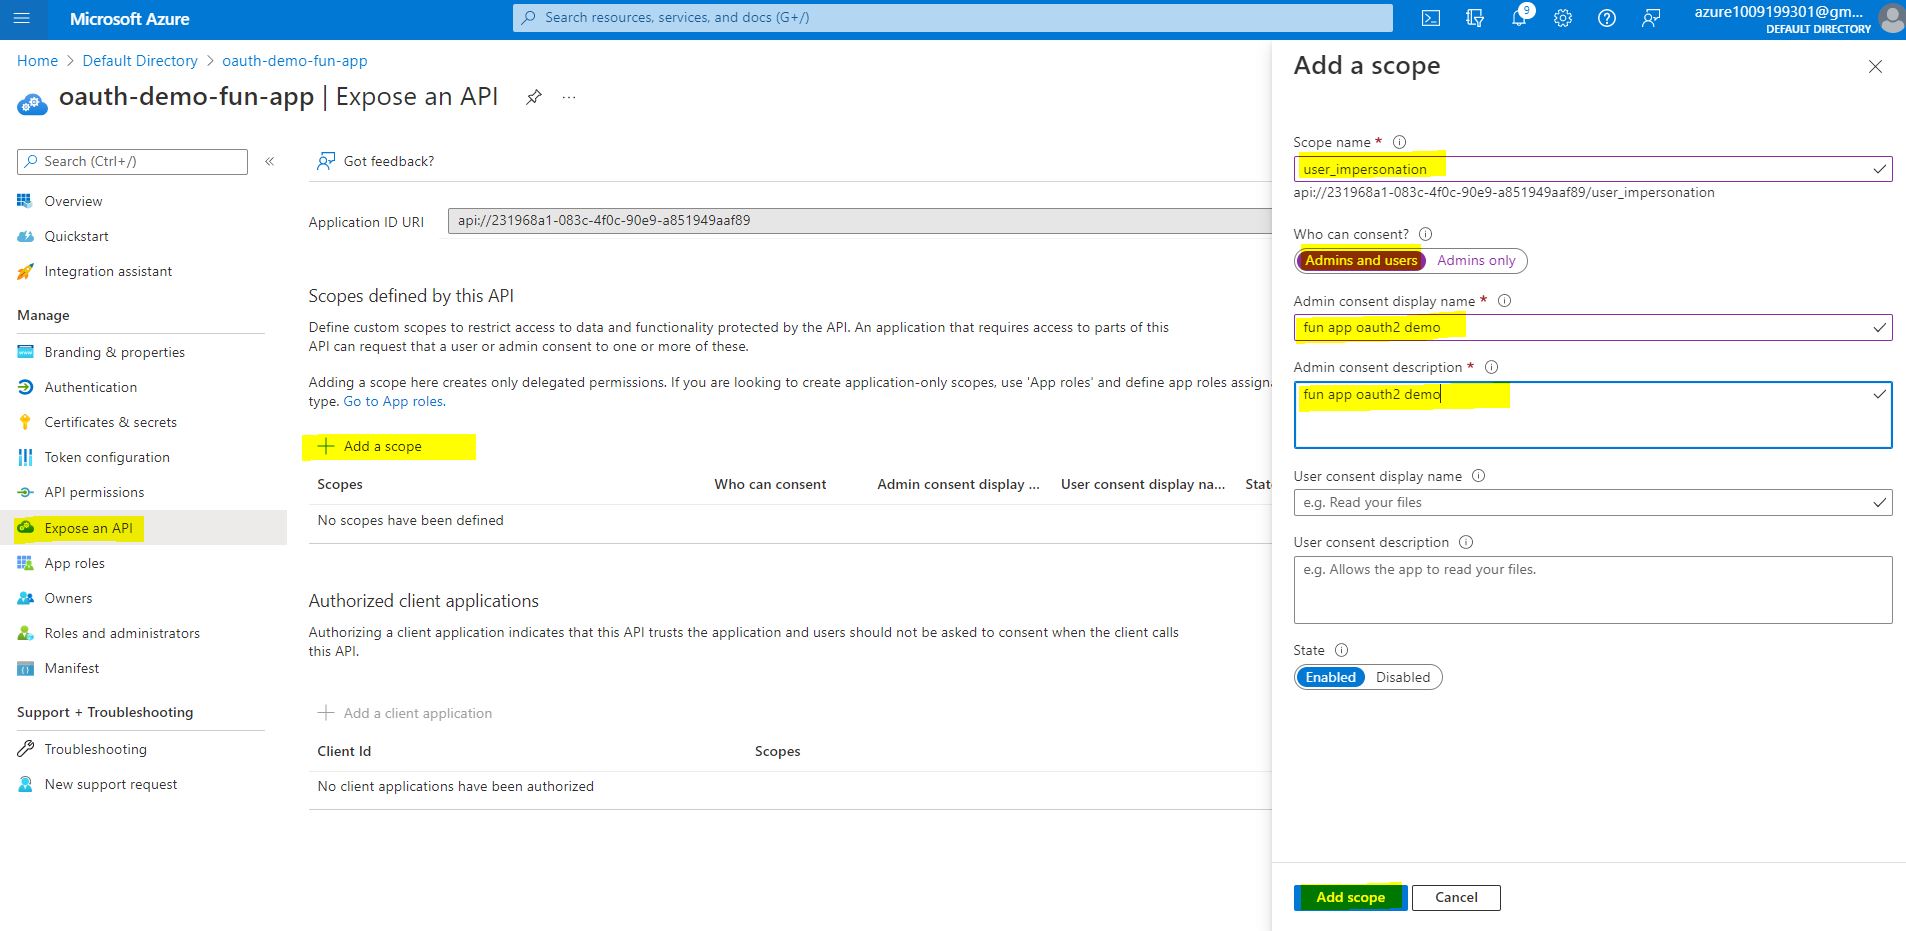
Copy the Application ID and Click on “Expose as API” to add a scope. Use “api://<Application Id>” that you copied. Click on save and continue.


Give scope name as “user_impersonation”, choose “Admin and users”, provide description and display name as per below screenshot.

Click on Add Scope


 If scope added successfully, similar below screen will be appeared


Now let create a new client secret for the API. This credential will be used to call token API. Secret will be appeared only once so make sure you copy it once created otherwise create a new one.


Click on “New Client Secret” and provide description and choose expiry duration.

Note* - From portal you can choose up to 24 months only, if you want to create for longer period or never expired, use PowerShell or terraform code etc.


 Once secret is generated copy it somewhere secured.


To verify if your Token API is working and generating the token properly, click on Overview and click on the endpoint as per below screenshot


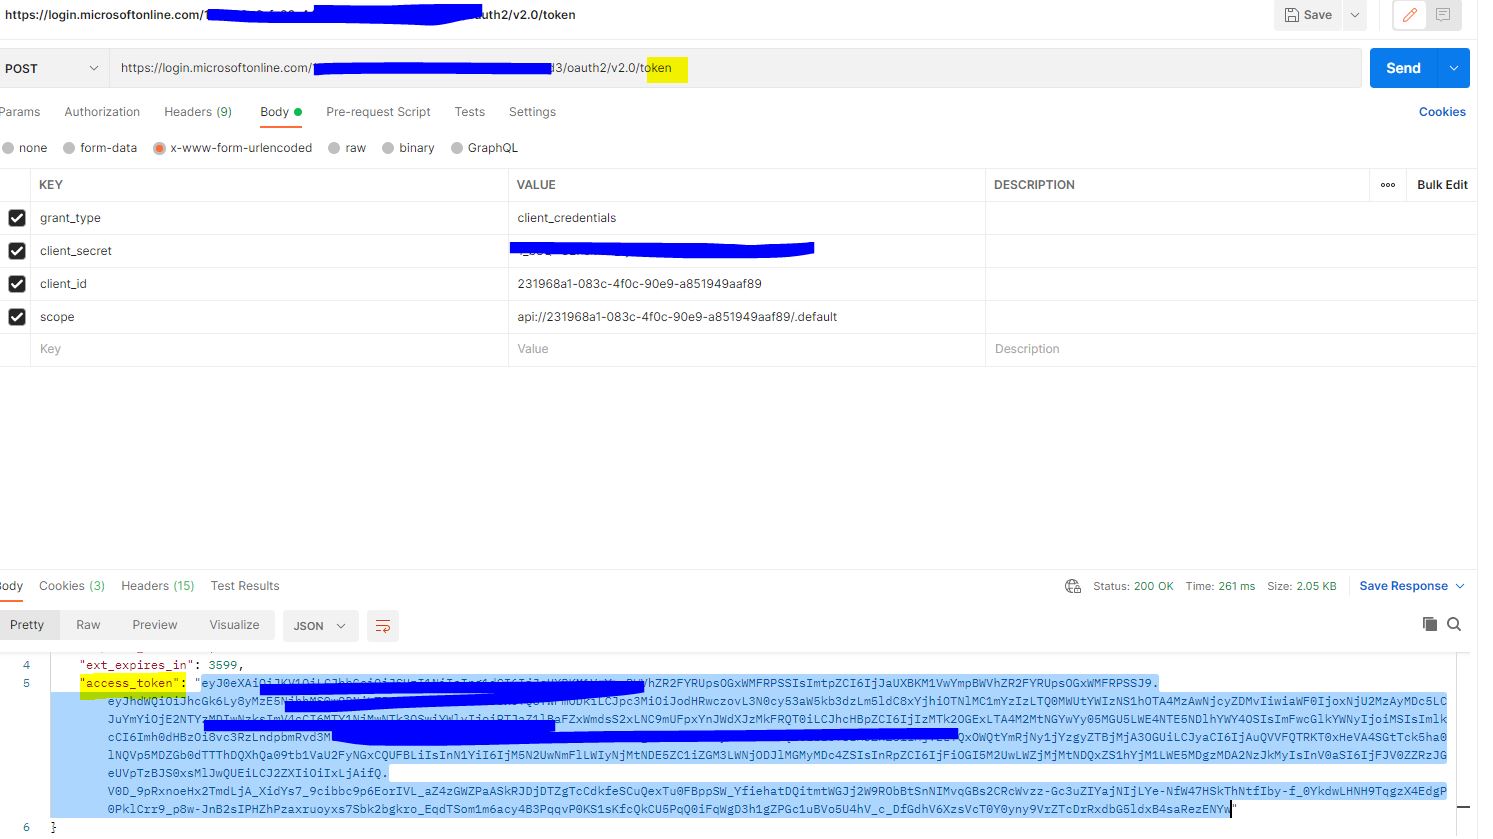
Copy the OAuth 2.0 token endpoint to test it in postman. As per below

Postman Request:

Method POST

URL: Token API 2.0 (copy it from endpoint)

Body: x-www-form-urlencoded

            Grant_type:       client_credentails

            Client_secret: (use the secret that we created in above step)

            Client_id: Application (Client) ID of the app registration

Scope: api://<application id>

Hit the URL you should be getting a valid JWT token


 Create a Function App:

This is the 2nd phase where are going to create a function app in the portal. I’ll be using dotnet runtime, windows based with consumption-based plan.

 I have given my function app name auth2-demo


 To choose Azure Ad as an Identity provider, click on “Authentication” link and click on Add an Identity Provider


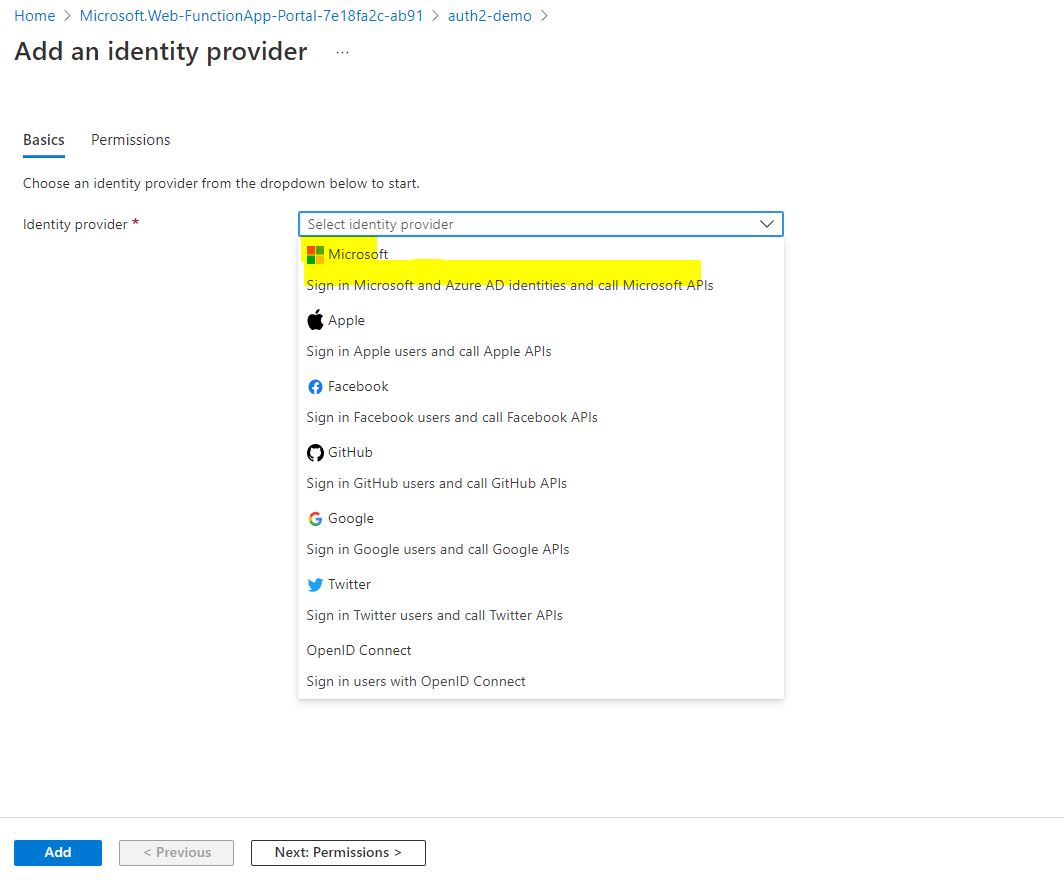
 Choose Microsoft from the Identity Provider dropdown like below screenshot


Now there are two options when it comes to selecting Microsoft as an Identity provider. You can create one from here or choose an existing one. Since we have created App registration at the beginning of the blog so we will use that option (which is existing one).

 You can select your app registration from the dropdown and use Require Authentication as restricted access and HTTP 401 Unauthorized recommended for API option. You can choose to click Token store.

 Click on Add button.


You should be able to see below screen


 Now click on Edit option again to choose Audience (I am not sure why it is not visible when we choose the ID provider)


 Provide the Allowed token audiences

Value will be: api://<Application (Client) Id>


You can again copy this value from App registration overview page.


Create a Function app using C# code from Visual Studio


 This is the last phase of our blog where are will be creating C# function app with “Anonymous” access. This will a http trigger-based function app like below screen shot


Note* - Anonymous Access is required if you want to use Azure AD as an ID Provider.


This is going to be very simple function app which is generated by default.


Let’s publish this function App in our subscription where we created consumption-based function app.


 Choose the function app and click on publish


Once the function app is published let’s try to call it from the postman. Below request is failed as we know it needs a “Authorization” token. It gives me 401 unauthorized access.


Let’s get the token from the token API. Use the previous token API to get the token. Copy the token once generated.


 Pass this token in “Authorization” header in Function APP URL. You should be able to see the 200 OK response.


OAuth 2.0 is widely used and accepted protocol. You can restrict function App with some other security pattern as per your requirement.


Sunday, August 15, 2021

Perform CRUD operation on SQL Server DB table from Azure Logic APP

In this blob we are going to see how we can perform CRUD operation on SQL server DB from Logic APP. We will modify our existing Logic APP that we created in previous blog.

We have already performed Insert operation in previous blog and here I am going to explain other 3 GET, PUT, DELETE operation here.

Update Existing Logic APP:

Let’s update existing logic app “db-access-demo” and delete “Insert Row” SQL server connector from it which is the second connector in the Logic APP.


Read Operation:

Change the HTTP operation to GET as we are going to get data from database, earlier it was POST method.


Click on add connector on the same place and add “Get Rows v2” connector. Since we have already created SQL connection, so database details and table name are already visible here in dropdown.


Choose server, Database name and the “emp_details” table as illustrated below.


Now in the response connector where we have to provide output. In the Body textbox, select the “value” dynamic content which is coming from the previous “Get row” connector as illustrated below.


 Save the Logic app and open POSTMAN tool to test the logic app. We are going to get all the data from the database without having any condition to keep it simple. Test the Logic app by hitting the URL you should be able to see the result coming in an array JOSN as mentioned below.


Update Operation:


Now again let’s delete the existing “Get Rows” SQL connector and replace it with the “Update row V2” connector. In the Request Connector, change the HTTP method from GET to PUT.


Map the parameter which you want to update similar to the below example. Make sure “Row id” has to be mapped with the “Primary Key” in the database as we have to update a row against the primary key. In our example we have “EmpId” is the primary key, so I have mapped it with “Row id”. You can also map another parameter based on your requirement.


In the response connector, replace the Dynamic body content to below hardcoded response with 200 status code.


{
   "Result":"Details has been updated successfully"
}


Now give it a test from the POSTMAN tool, you should be getting expected response.


You can also verify the database table details; your value should be updated here.


Delete Operation:


Let’s now see how we can perform Delete operation. Remove the Update SQL Server connector from the Logic App and replace it with the “Delete row (V2)” connector as we are going to delete a record from table.


Provide the connection details similar to other operation we just did.

Provide the “EmpId” parameter to “Row Id” textbox as it expects a Primary Key.


Update the response body static response with below one.


{
   "Result":"Details has been deleted successfully"
}


 Save the logic app and hit the request from the POSTMAN. You should see the success response.


Let’s now verify the record in the database, that should have been deleted.