Showing posts with label Logic APP. Show all posts

Thursday, February 23, 2023

Azure storage event trigger with user managed identity arm template


Recently I was working on one of the event-based solution where I had to trigger a logic app when a file is put on the storage account. It all looked fine when I was doing it manually on the portal but when I had to promote it to higher environment through the pipeline, I faced one issue. The issue was basically to find the dynamic URL of the Logic App. To get dynamic URL of the HTTP logic app is fine and you can get that with the below piece of code.


Get HTTP Logic APP URL

"url": "[substring(listCallbackUrl(resourceId(parameters('ResourceGroup'), 'Microsoft.Logic/workflows/triggers', parameters('LogicApps'), 'manual'), '2016-10-01').basePath,0,add(10,indexOf(listCallbackUrl(resourceId(parameters('ResourceGroup'), 'Microsoft.Logic/workflows/triggers', parameters('LogicApps'), 'manual'), '2016-10-01').basePath,'/triggers/')))]"


But I was struggling to get below URL through ARM template.


I have created a template which creates user-based managed identity Logic APP and will be triggered as soon as I put a file into the storage account.

So, before we run this ARM template, lets create a user managed identity and the storage account.

I have created a resource group and 2 resources inside it.

·       Resource Group            : event-trigger-logicapp

·       User Managed Identity   : event-test-identity

·       Storage Account           : eventtriggerstorage01


Important: Give contributor role to user managed identity to subscription level.


Now create a new "Custom Template Deployment" resource in event-trigger-logicapp resource group.


ARM Template: Make sure you update Logic App Name, Storage Account, Resource Group, Subscription ID and User Managed Identity values as highlighted.

{

    "$schema": "https://schema.management.azure.com/schemas/2019-04-01/deploymentTemplate.json#",

    "contentVersion": "1.0.0.0",

    "parameters": {

        "workflows_EventGridTest_name": {

            "defaultValue": "storage-event-logicapp",

            "type": "String"

        },

        "connections_azureeventgrid_name": {

            "defaultValue": "azureeventgrid",

            "type": "String"

        },

        "storageAccounts_storageaccountlogica_externalid": {

            "defaultValue": "/subscriptions/7bbce658-682f-417d-88f6-810b6fb20f4d/resourceGroups/event-trigger-logicapp/providers/Microsoft.Storage/storageAccounts/eventtriggerstorage01",

            "type": "String"

        },

        "userAssignedIdentities_ManagedContributor_externalid": {

            "defaultValue": "/subscriptions/7bbce658-682f-417d-88f6-810b6fb20f4d/resourceGroups/event-trigger-logicapp/providers/Microsoft.ManagedIdentity/userAssignedIdentities/event-test-identity",

            "type": "String"

        }

    },

    "variables": {},

    "resources": [

        {

            "type": "Microsoft.Web/connections",

            "apiVersion": "2016-06-01",

            "name": "[parameters('connections_azureeventgrid_name')]",

            "location": "australiaeast",

            "kind": "V1",

            "properties": {

                "displayName": "test2",

                "statuses": [

                    {

                        "status": "Ready"

                    }

                ],

                "customParameterValues": {},

                "createdTime": "2023-02-01T03:49:55.8553087Z",

                "changedTime": "2023-02-01T03:49:55.8553087Z",

                "api": {

                    "name": "azureeventgrid",

                    "displayName": "Azure Event Grid",

                    "description": "Azure Event Grid is an eventing backplane that enables event based programing with pub/sub semantics and reliable distribution & delivery for all services in Azure as well as third parties.",

                    "iconUri": "https://connectoricons-prod.azureedge.net/releases/v1.0.1538/1.0.1538.2619/azureeventgrid/icon.png",

                    "brandColor": "#0072c6",

                    "id": "/subscriptions/7bbce658-682f-417d-88f6-810b6fb20f4d/providers/Microsoft.Web/locations/australiaeast/managedApis/azureeventgrid",

                    "type": "Microsoft.Web/locations/managedApis"

                },

                "parameterValueType": "Alternative",

                "testLinks": []

            }

        },

        {

            "type": "Microsoft.Logic/workflows",

            "apiVersion": "2017-07-01",

            "name": "[parameters('workflows_EventGridTest_name')]",

            "location": "australiaeast",

            "dependsOn": [

                "[resourceId('Microsoft.Web/connections', parameters('connections_azureeventgrid_name'))]"

            ],

            "identity": {

                "type": "UserAssigned",

                "userAssignedIdentities": {

                    "/subscriptions/7bbce658-682f-417d-88f6-810b6fb20f4d/resourceGroups/event-trigger-logicapp/providers/Microsoft.ManagedIdentity/userAssignedIdentities/event-test-identity": {}

                }

            },

            "properties": {

                "state": "Enabled",

                "definition": {

                    "$schema": "https://schema.management.azure.com/providers/Microsoft.Logic/schemas/2016-06-01/workflowdefinition.json#",

                    "contentVersion": "1.0.0.0",

                    "parameters": {

                        "$connections": {

                            "defaultValue": {},

                            "type": "Object"

                        }

                    },

                    "triggers": {

                        "When_a_resource_event_occurs": {

                            "splitOn": "@triggerBody()",

                            "type": "ApiConnectionWebhook",

                            "inputs": {

                                "body": {

                                    "properties": {

                                        "destination": {

                                            "endpointType": "webhook",

                                            "properties": {

                                                "endpointUrl": "@{listCallbackUrl()}"

                                            }

                                        },

                                        "filter": {

                                            "includedEventTypes": [

                                                "Microsoft.Storage.BlobCreated"

                                            ]

                                        },

                                        "topic": "[parameters('storageAccounts_storageaccountlogica_externalid')]"

                                    }

                                },

                                "host": {

                                    "connection": {

                                        "name": "@parameters('$connections')['azureeventgrid_1']['connectionId']"

                                    }

                                },

                                "path": "/subscriptions/@{encodeURIComponent('7bbce658-682f-417d-88f6-810b6fb20f4d')}/providers/@{encodeURIComponent('Microsoft.Storage.StorageAccounts')}/resource/eventSubscriptions",

                                "queries": {

                                    "x-ms-api-version": "2017-06-15-preview"

                                }

                            }

                        }

                    },

                    "actions": {

                        "Compose": {

                            "runAfter": {},

                            "type": "Compose",

                            "inputs": 111

                        }

                    },

                    "outputs": {}

                },

                "parameters": {

                    "$connections": {

                        "value": {

                            "azureeventgrid_1": {

                                "connectionId": "[resourceId('Microsoft.Web/connections', parameters('connections_azureeventgrid_name'))]",

                                "connectionName": "azureeventgrid",

                                "connectionProperties": {

                                    "authentication": {

                                        "identity": "[parameters('userAssignedIdentities_ManagedContributor_externalid')]",

                                        "type": "ManagedServiceIdentity"

                                    }

                                },

                                "id": "/subscriptions/7bbce658-682f-417d-88f6-810b6fb20f4d/providers/Microsoft.Web/locations/australiaeast/managedApis/azureeventgrid"

                            }

                        }

                    }

                }

            }

        }

    ]

}


After a successful run, you should be below resources are created out of template deployment.


Let’s create a “toprocess” name container and put a file there.


You will notice that logic app has triggered.


If you look into the “Event Grid System Topic” a URL gets created automatically. This URL gets created internally so as per my understanding you can't get this URL through ARM similar to HTTP one. (I could be wrong though 😊)


Sunday, August 15, 2021

Perform CRUD operation on SQL Server DB table from Azure Logic APP

In this blob we are going to see how we can perform CRUD operation on SQL server DB from Logic APP. We will modify our existing Logic APP that we created in previous blog.

We have already performed Insert operation in previous blog and here I am going to explain other 3 GET, PUT, DELETE operation here.

Update Existing Logic APP:

Let’s update existing logic app “db-access-demo” and delete “Insert Row” SQL server connector from it which is the second connector in the Logic APP.


Read Operation:

Change the HTTP operation to GET as we are going to get data from database, earlier it was POST method.


Click on add connector on the same place and add “Get Rows v2” connector. Since we have already created SQL connection, so database details and table name are already visible here in dropdown.


Choose server, Database name and the “emp_details” table as illustrated below.


Now in the response connector where we have to provide output. In the Body textbox, select the “value” dynamic content which is coming from the previous “Get row” connector as illustrated below.


 Save the Logic app and open POSTMAN tool to test the logic app. We are going to get all the data from the database without having any condition to keep it simple. Test the Logic app by hitting the URL you should be able to see the result coming in an array JOSN as mentioned below.


Update Operation:


Now again let’s delete the existing “Get Rows” SQL connector and replace it with the “Update row V2” connector. In the Request Connector, change the HTTP method from GET to PUT.


Map the parameter which you want to update similar to the below example. Make sure “Row id” has to be mapped with the “Primary Key” in the database as we have to update a row against the primary key. In our example we have “EmpId” is the primary key, so I have mapped it with “Row id”. You can also map another parameter based on your requirement.


In the response connector, replace the Dynamic body content to below hardcoded response with 200 status code.


{
   "Result":"Details has been updated successfully"
}


Now give it a test from the POSTMAN tool, you should be getting expected response.


You can also verify the database table details; your value should be updated here.


Delete Operation:


Let’s now see how we can perform Delete operation. Remove the Update SQL Server connector from the Logic App and replace it with the “Delete row (V2)” connector as we are going to delete a record from table.


Provide the connection details similar to other operation we just did.

Provide the “EmpId” parameter to “Row Id” textbox as it expects a Primary Key.


Update the response body static response with below one.


{
   "Result":"Details has been deleted successfully"
}


 Save the logic app and hit the request from the POSTMAN. You should see the success response.


Let’s now verify the record in the database, that should have been deleted.


Thursday, August 12, 2021

Access and Insert Data in SQL Server Database from Azure Logic APP

In this blog we are going to see how to access database and insert records using Logic App. Azure Logic App provides many inbuild connectors and SQL server is one of them. Using this SQL Database connector, we can easily perform CRUD operations. Having said that, Logic app has other DB connectors as well. In our case, we will use SQL server Database connector.

Let’s get started.

Create a SQL Server Database Instance:

First, we have to create a SQL server DB instance so that we can connect that from Logic APP. We can choose the SQL server service in the Azure resources and provide some details like server name, location, username and password as mentioned below.


Once we have that in place, we can whitelist our IP address to access it from our machine.


I have created a table with the name of “emp_details” and we will use this table to store information from the Logic APP.


Please make EmpID as primary key as we need it for next tutorial (I haven’t made it as primary key here in above screenshot but that has been changed with primary key.)

Create a Logic APP:

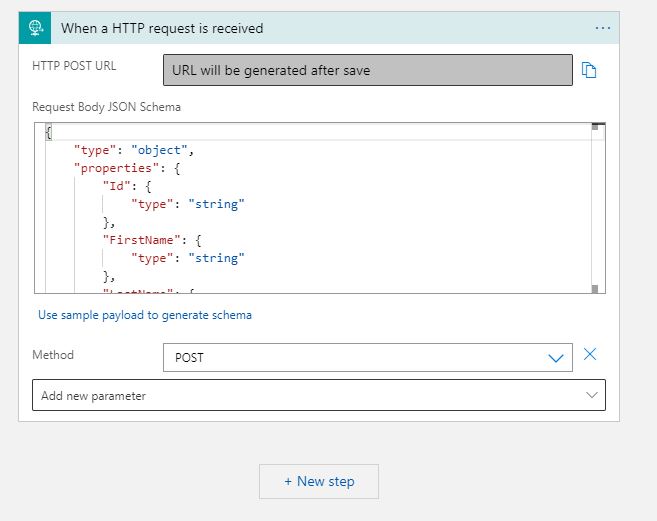
Let’s create a Logic APP, I have given “db-access-demo” and choose Trigger as HTTP. Use method as POST so that we can post a body from HTTP URL to insert records in database.

As a payload schema use below example:

{
   "EmpId":"string",
   "EmpName":" string ",
   "EmpAddress":" string ",
   "Qualification":" string "
}


Click on the Next step and search for “sql server” in connector search area as mentioned below. Once that is visible choose “Insert row (V2)” Action.


It will ask you to create a connection, where you have to provide database connection details like username, password, server url etc. once provided click on create. 


If all good, then you can see the details visible in droop down like database name and table name.

Choose “emp_details” as table and select all the parameter as we are going to insert all 4 details of the employee.


Select and map the parameter which is coming from the HTTP POST body in the request to the Database column as per below screenshot.


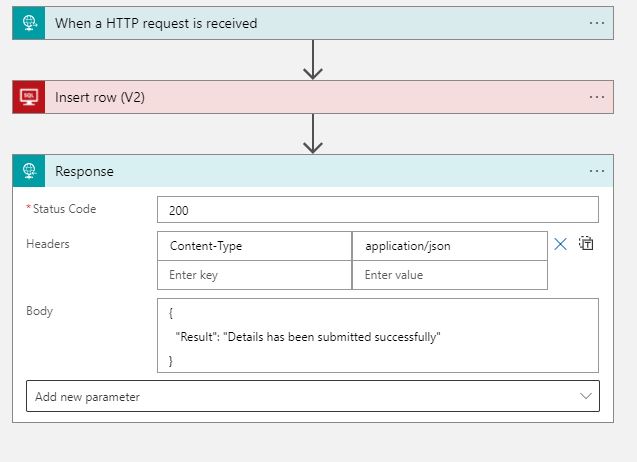
Add a “Response” connector, where we will provide the HTTP response body, for now we are using static one.


Save the logic app and try running it from the postman, you should be getting 200 success response similar to below screenshot

You can use the similar example that should match with your DB table structure and schema that you defined in HTTP connector


{
   "EmpId":"111",
   "EmpName":"Shri",
   "EmpAddress":"Wellington",
   "Qualification":"IT"
}


Since we haven’t received any error these records should be inserted into the Database. So execute query to see the record and you should see that records have been inserted from the Logic APP


You can also see in the Logic APP logs to analyzed that what happened in each connector.


Thursday, August 5, 2021

Move, Copy and Delete blob with Azure Logic App


Recently I have been working with the blob storage where in many cases I had to move, copy, and delete the blob from the storage after performing some actions on those blobs. In this blog I am going to talk about how to perform copy, move, delete operation on Azure blob storage from the Logic APP.


This is quite simple to perform these operations as Logic App provides these inbuild function so all we need to do is to call relevant function for a particular requirement.


Requirement: In my requirement I had to read the file content from the boob storage and after reading it I had to move it to different blob storage and in some scenario, I had to delete it permanently from the blob storage. So, let’s see how we can achieve it.


Create A Logic APP:

This first step is obviously creating a Logic App. If you want to see how to create from scratch, then please follow my previous blog.


You can use any trigger as this in totally independent functionality.


Create a Connection:

After creating a logic app and trigger, you have to make a connection to the Azure blob (if you dint have already). You need to provide your credentials to create connection.


Azure Blob inbuilt function:

When you choose “Azure Blob” as “+ New Step” and after creating a connection with blob, you can see multiple option Azure Logic App provides for use to use. You can see in below screenshot where you can choose Create Blob, Copy blob, delete blob etc.


Copy Blob:

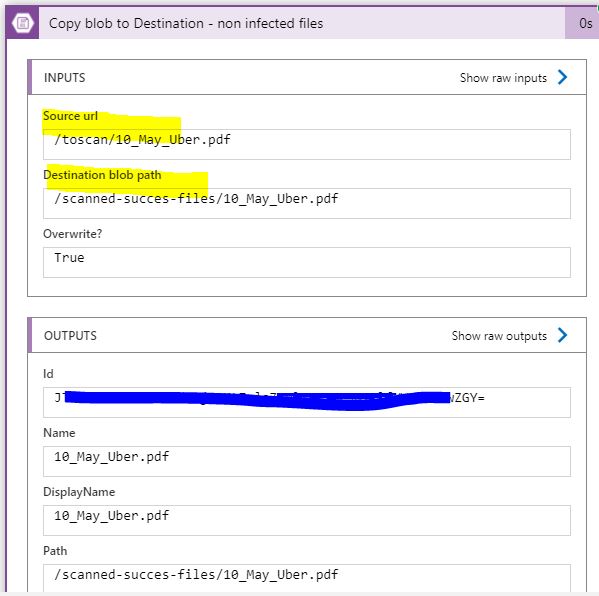
Copying blob functionality can be achieved by specifying Source URL and Destination URL. In below example I have given dynamic values as this is the common pattern, we use otherwise you can use a static one.


In below screenshot you can see how the dynamic URL is generated after running the Logic APP. This is something we can also provide as static value.


Delete Blob:

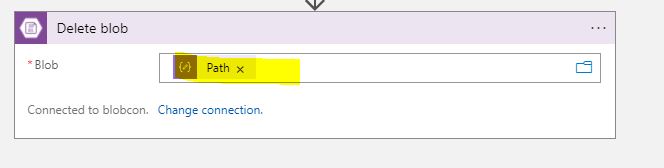
This is also one of the inbuilt functions provided by the logic app to play with Azure blob. Simply use the Delete blob from the option and provide the blob path which you want to delete. Below is the dynamic one.


Dynamic one will be changed to below URL if we run this app.


Move Blob from one to another folder:

There is no functionality like that but what we can do to achieve it to simply copy first from source to destination folder and then perform delete operation in the source folder to delete the blob

Thursday, July 29, 2021

Call a Rest API from Azure Logic APP

I am going to talk about a very common scenario in our day to day life as integration developer. There are lot of requirement or scenario where we have to call 3rd party APIs. In one of my previous blogs I have shown how to call SOAP API but, in this blog, we will see how to call a 3rd party Rest API.


Backend Service:

We have a backend rest service with POST operation and its request and response looks like below.


URL: https://<hostname>/xxx/xxx

Method: POST

Request:

{
   "Name":"testname",
   "PhoneNumber":"0123456789",
   "Message":"test message"
}


Response:

Once we submit above request payload, the message is submitted in database and returns with 201 Created response code with below payload.

{
   "Result":"Details has been submitted successfully"
}


We have to call above API from the Logic App. We will also do some transformation inside the logic app to understand, how easy to do transformation in Logic App if it comes to one to one mapping


Logic App:

  • Let’s create a simple consumption-based logic app by choosing your subscription and resource group, I have given “call-rest-api-demo” name to my Logic App.


  • Choose trigger as HTTP, as we are going to call this Logic App from the API endpoint, so we need to have trigger as HTTP.


  • Let's now provide the input payload schema so that we know what the expected payload is we need to pass to call this Logic App.


  • To generate the schema, we can pass the sample JSON payload and Logic App connector will create the schema for us.


{
   "Id":"11",
   "FirstName":"Shri",
   "LastName":"0123456789",
   "Message":"Test Message",
   "ContactNumber":"423422234",
   "Address":"Wellington"
}


  • Give method as POST, we will be passing request payload with POST HTTP method.


Choose the HTTP connector in next step by clicking “+ New Step”. And provide the below details

Method: POST

URL: backend service URL

Body: 

Provide the static body and replace the value from the dynamic content as mentioned below. If you see, we are only using required parameter and also doing some transformation for example FirstName + LastName becomes Name as this required in backend service to save data into the database. However, we are not managing backed service here.


  • Now we set the response what we get it from the backend, we are not modifying the response at all. Backend response will be returned by this Logic APP.


  • Select the dynamic “Body” which is being returned from the HTTP connector. Similar to below screenshot.


  • Save the Logic App, you will see a URL generated at HTTP trigger connector.


  • Use the HTTP URL with HTTP POST method and provide the below JSON payload as request and submit the request.

{
   "Id":"11",
   "FirstName":"Shri",
   "LastName":"Kant",
   "Message":"This message is for 3rd party service",
   "ContactNumber":"423422234",
   "Address":"Wellington"
}

  • You will receive the success response, however this response initially received at Logic App from the backend service and then return to the client (Postman, in this case) without any modification.


  • If you want to see what has happened step to step, then go to the Run History and open any transaction. Main request has been filtered to call backend service and “FirstName” and “LastName” attribute becomes “Name” as we have concinnated both strings.


  • Below screenshot is from the response connector