Showing posts with label Azure. Show all posts

Monday, July 15, 2024

HVR 05 - Setup HVR HUB with MySQL Database on Azure VM

You need to follow these steps to set up an HVR Hub with a MySQL database on an Azure VM.
Database, Agane, source, and destination details can be found in the previous blogs

Step 1: Create a VM on Azure

Ensure you have an Azure VM running Windows with administrative access.


Step 2: Install HVR HUB on VM

Download the HVR setup exe file


Install the HVR HUB on the Windows VM. 


Click next and choose HVR hub this time. 


Click "Next." The default port is 4340 for HTTP. If you want to use a certificate and run on HTTPS, the port will be 4341.


Click Next and choose “Local System Account”.

Click on the Check Box and Click Next to install the HVR Hub


Click "Finish" once everything is properly configured.


Open the inbound port on the VM to allow the HVR HUB to run on the browser.


Select "Inbound rules" and click on "Port."


Open ports 80 and 4340 for HTTP, and ports 443 and 4341 for HTTPS.


Give the name of the port config

Try opening the HVR hub using the VM's IP address on port 4341. If you see the screen below, then everything is set up correctly.


Step 3: Install HVR Repository


I have chosen the MySQL server for the HVR repository. HVR also supports other databases, so feel free to select any other supported database based on your preference.

I am creating a MySQL server on the Azure cloud.


Make sure to allow the port and IP address to access this MySQL server from your machine or any other location where you intend to manage this HVR repository.

I have installed MySQL Workbench to test the data.


Step 4: Connect HVR HUB to the MYSQL Repository


Open the HVR hub in your browser and select MySQL as the HVR repository server as described below. 

Enter the username, hostname, port, and password, and attempt to establish the connection.


If you get the above error then go to Azure Portal and change the “require_secure_transport” setting from OFF to ON.


Save the setting.


Now try connecting that again, you should be able to connect it successfully.


Upload the License: 

You need a valid license to use HVR. Once you have the license, simply upload it as instructed below.


Verify the license and finish the setup. You'll need to provide the HVR HUB username and password to log in from the browse.


After completing the setup, you should be able to view multiple tables created by the HVR HUB. These tables should be managed exclusively through the HVR HUB UI.


If you see the screen below, you are ready to proceed with creating locations.


Tuesday, May 9, 2023

Azure Application Gateway with APIM Internal Mode: Set Up Part 3 (Exposing Developer Portal on Internet and using path-based routing for external API in Application Gateway)


We are going to change only the Developer Portal details so that we can access it through Application Gateway from the Internet. No change is required on API Manger Gateway as we have tested that from the Application Gateway.

There is an issue that we cannot use the same RootCA certificate for the Gateway and Developer Portal as one RootCA can cater to only one backend. We must change the RootCA certificate for the Developer Portal so that we can expose it. So, we will keep the old RootCA certificate for the Gateway and create a new RootCA and SSL cert for the Developer Portal, but we need to make sure that we don’t change the FQDN which is devportal.demo.com as we have used the same name in Private DNS Zone.

Create a new RootCA and SSL certificate:

  • Let’s follow the same process I used in the first part of the blog.

C:\Work\study\APIM\demo\portal>openssl req -x509 -newkey rsa:4096 -keyout portal.key -out portal.crt -days 365 -nodes
...+.+..+...+....+.....+...+....+++++++++++++++++++++++++++++++++++++++++++++*.+......+............+........+...+....+++++++++++++++++++++++++++++++++++++++++++++*..+....+...+...+...+.....+.........+...........................+....+..+..........+.........+.....+...+.+.....+.........+...+..........+........+......................+.....+++++
-----
You are about to be asked to enter information that will be incorporated
into your certificate request.
What you are about to enter is what is called a Distinguished Name or a DN.
There are quite a few fields but you can leave some blank
For some fields there will be a default value,
If you enter '.', the field will be left blank.
-----
Country Name (2 letter code) [AU]:NZ
State or Province Name (full name) [Some-State]:Wellington
Locality Name (eg, city) []:Wellington
Organization Name (eg, company) [Internet Widgits Pty Ltd]:student
Organizational Unit Name (eg, section) []:student
Common Name (e.g. server FQDN or YOUR name) []:fabrikamportal.com
Email Address []:

C:\Work\study\APIM\demo\portal>openssl pkcs12 -export -in portal.crt -inkey portal.key -out portal.pfx
Enter Export Password:
Verifying - Enter Export Password:

C:\Work\study\APIM\demo\portal>openssl req -newkey rsa:4096 -out demo.csr -keyout demo.key -nodes
...+....+..+.............+..+..........+...+.....+.+.....+.+........+.+............+....................+...+++++++++++++++++++++++++++++++++++++++++++++*...+....+.....+.+..+...+....+...+...+...+..+...+......+...+.+..+.......+......+..+.......+.....+...+..........++++++++++++++++++++
-----
You are about to be asked to enter information that will be incorporated
into your certificate request.
What you are about to enter is what is called a Distinguished Name or a DN.
There are quite a few fields but you can leave some blank
For some fields there will be a default value,
If you enter '.', the field will be left blank.
-----
Country Name (2 letter code) [AU]:NZ
State or Province Name (full name) [Some-State]:Wellington
Locality Name (eg, city) []:Wellington
Organization Name (eg, company) [Internet Widgits Pty Ltd]:student
Organizational Unit Name (eg, section) []:student
Common Name (e.g. server FQDN or YOUR name) []:devportal.demo.com
Email Address []:

Please enter the following 'extra' attributes
to be sent with your certificate request
A challenge password []:password
An optional company name []:

C:\Work\study\APIM\demo\portal>openssl x509 -req -in demo.csr -CA portal.crt -CAkey portal.key -CAcreateserial -out demo.crt -days 365
Certificate request self-signature ok
subject=C = NZ, ST = Wellington, L = Wellington, O = student, OU = student, CN = devportal.demo.com

C:\Work\study\APIM\demo\portal>openssl pkcs12 -export -in demo.crt -inkey demo.key -out demo.pfx
Enter Export Password:
Verifying - Enter Export Password:

C:\Work\study\APIM\demo\portal>


    Commands:

  • openssl req -x509 -newkey rsa:4096 -keyout portal.key -out portal.crt -days 365 -nodes
  • openssl pkcs12 -export -in portal.crt -inkey portal.key -out portal.pfx
  • openssl req -newkey rsa:4096 -out demo.csr -keyout demo.key -nodes
  • openssl x509 -req -in demo.csr -CA portal.crt -CAkey portal.key -CAcreateserial -out demo.crt -days 365
  • openssl pkcs12 -export -in demo.crt -inkey demo.key -out demo.pfx

Update the new SSL cert for the custom domain in the API Manager instance.

  • Follow the same process I did in the first part


  • Click the save button, it will take some time to get updated once done we will test the Developer Portal from the VM

  • The certificate is saved now, let’s try to access the developer portal from the Virtual Machine.


All looking good from the VM, and we can access the developer portal after changing the certificate.

Open Application Gateway and add a new Listener for Developer Portal

Create a new listener for the portal with the below details, I am using port 80 to keep things simple


  • Click on save
  • Update the backend pool with the below details and make sure you use devportal.demo.com on your FQDN which we configured


Add Backend Setting:

Add a backend setting like the below details


  • Change the certificate extension from .crt to .cer and upload it. This should be RootCA cert we just created for the developer portal

Your setting should be similar below


Add Rule:

  • Add a new Rule for the Developer Portal
  • Select PortalListner


  • And update the Backend target and Backend Settings

  • Click Save.

If all good, then you should be able to see your developer portal exposed on http port 80 over public IP address, let’s test this out


The developer portal is now exposed successfully.

Your Backend Health must be healthy as mentioned below.


Expose External APIs using path-based routing in Application Gateway.

I will be creating a separate blog for path-based routing, but at a high level what we do, I have written here

We have everything we need now, to secure internal and external API we can make use of path-based routing. For example, we have 2 below APIs running on VM and we want to expose only one API to an external vendor and want to keep one for internal.

·       https://<host_name>/api/produc

·       https://<host_name>/api/employee

We must create an API proxy for each service on API Manager with the below URL


API Management Proxies:

·       https://<host_name>/internal/api/product

·       https://<host_name>/external/api/employee


We can now create path-based routing for external API

Open Application Gateway

  • Delete the existing External Rule
  • Add new External Rule


  • Add path-based setting


  • Give /external/* value in the Path which makes sure that all the API which has the external keyword in the URL can be accessed from Application Gateway


  • Click add


  • We can now provide details of this API to external customers and publish it through Developer Portal


Sunday, April 30, 2023

Azure Application Gateway with APIM Internal Mode: Set Up Part 2 (Adding Application Gateway in VNET)


We are trying to replicate the above architecture design. As I mentioned in my previous blog, 1st part of the same architecture here, this architecture can cater to most of the current industry demands where developers can orchestrate internal APIs or On-Prem APIs. They can secure internal APIs with the API manager instance which is running inside a virtual network and if a developer needs to expose APIs for the business needs for the 3rd party vendor, they can do that too by using an Application Gateway. 

As Application Gateway is a layer 7 load balancer, we can decide what traffic we want to come inside and what to block.

In the first part, we created below resources:

  • Virtual Network 
  • API Manager inside a virtual network with a specific subnet
  • A Virtual Machine

  • An API inside the virtual machine
  • An API proxy on API manager and pointed that to VM’s API
  • We also successfully tested our API internally from the API manager

Architecture Diagram:


Step 1: Create an Application Gateway resource 

  • Create an application gateway resource as mentioned below
  • We want to keep very basic so won’t be selecting Auto Scaling or Availability 


  • Click next to put frontends details
  • Create an app-gw-public IP and put a private IP in the same subnet 10.0.2.10


Click next to add Backends as mentioned below

  • Give the Backend pool name
    • apim-backend-pool
    • API Gateway FQDN – api.demo.com


  • Click next to add Routing Rules

Add routing rules and fill in the below details

  • Add Rule
  • Add Listener
  • I am keeping it simple and using frontend with HTTP on port 8080


  • Add backend target details


  • Add Backend setting

  • Once done it should be as below 


  • Click the tag and create it. We will configure for internal IP later or part 3

After adding the setting, one more setting is required which is important.

  • Click on “Health Probes”
  • Give “/status-0123456789abcdef” in path
  • Choose the backend setting as HttpSetting
  • Click Test and Add


  • You can check the "Backend Health", it should be green if all is good.


Testing:

I am hitting the application gateway’s public IP address with an 8080 port from my machine and getting the expected result


This request is going via the Application gateway to the API manager to Virtual Machine (where we have created an API)

Internal Listener Setup:

Since Internal and External can’t listen on the same port, so using the 443 port and uploading a wild card cert for the same that I used in the API Manager custom domain, fill out below details 

  • Use Private IP in Frontend IP
  • Port: 443
  • Give any name in my case its gatewaycert
  • Upload .pfx cert
  • Provide password which was used during certificate creation
  • Click on Add


Provide below routing details

  • Choose Internal Listener this time
  • Give priority number I have given 10
  • Click Add


Provide Below details for the Backend Targets

  • Choose same apim-backend-pool
  • Choose same HttpSeting as our backend is going to be same
  • Click on Add button


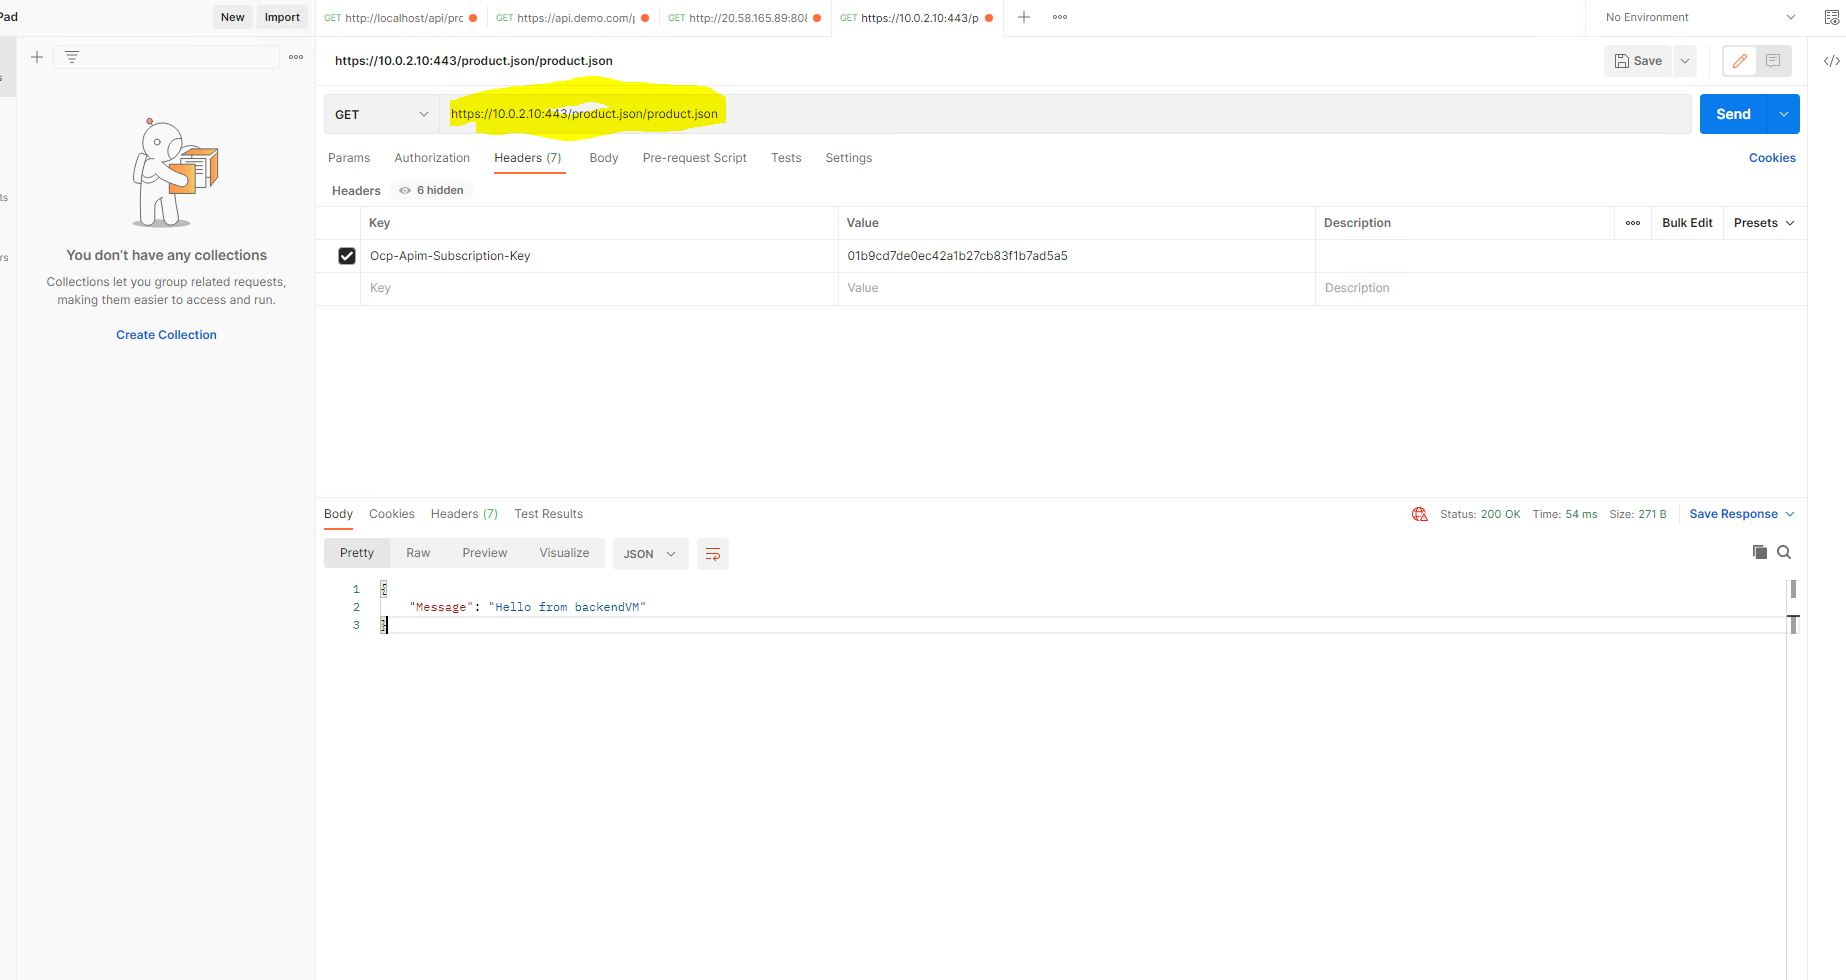
We have now configured everything, let’s test this out from the Postman

  • Login to the VM that we have
  • Try with Private IP Address this time, other URL parameter will remain same
  • You can see the expected result as mentioned below


We have demonstrated that we can now access the Application gateway inside the virtual network. The above request is flowing through Application Gateway to API Manager to Virtual Machine


We now might have another requirement where we have to expose our APIs to the 3rd party vendor. for that, we have exposed our developer portal to the Internet so that our vendor can access those APIs. Let’s expose our developer portal on internet in our next blog here