Tuesday, December 13, 2016

How to create a Domain Project in Mule Soft ESB

Mule Soft ESB provides the facility to share the resources with other projects, all you need to create a domain project and share the connector, resources, properties etc. with others projects. If you create a project individually then every project gets its own domain which is “default domain”. It means no project shares their resources with other project.

For example if you have created a project and want that project to be run on a particular port then you can’t run any other project but if you create a domain project and share its port and base URL then only by the last part of the URL you can change your flow.


To create a domain project, go to File—New—and select “Mule Domain Project”.


I have given my project name as “MuleDomainTest”.


Once you create a domain project, you can see 2 files there in project explorer.


  • mule-deploy.properties
  • mule-domain-config.xml


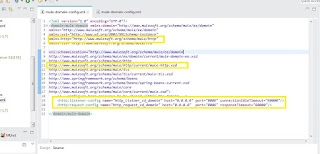
You need to add below line in the given XML in “xmlns:domain

,

Now you can add below HTTP connector with your port number and name etc.

<http:listener-config name="http_listner_cd_domain" host="0.0.0.0" port="8086" connectionIdleTimeout="60000"/>
    <http:request-config name="http_request_cd_domain" host="0.0.0.0"  port="8086" responseTimeout="60000"/>


Make sure that you don’t have any error in compilation.

Code:

<?xml version="1.0" encoding="UTF-8"?>
<domain:mule-domain xmlns:domain="http://www.mulesoft.org/schema/mule/ee/domain" 
xmlns="http://www.mulesoft.org/schema/mule/ee/domain"
xmlns:xsi="http://www.w3.org/2001/XMLSchema-instance" 
xmlns:http="http://www.mulesoft.org/schema/mule/http"
xmlns:tls="http://www.mulesoft.org/schema/mule/tls"

xsi:schemaLocation="http://www.mulesoft.org/schema/mule/ee/domain
http://www.mulesoft.org/schema/mule/ee/domain/current/mule-domain-ee.xsd
http://www.mulesoft.org/schema/mule/http
http://www.mulesoft.org/schema/mule/http/current/mule-http.xsd
http://www.mulesoft.org/schema/mule/tls
http://www.mulesoft.org/schema/mule/tls/current/mule-tls.xsd
http://www.springframework.org/schema/beans
http://www.springframework.org/schema/beans/spring-beans-current.xsd
http://www.mulesoft.org/schema/mule/core
http://www.mulesoft.org/schema/mule/core/current/mule.xsd">
    <!-- configure here resource to be shared within the domain -->
    <http:listener-config name="http_listner_cd_domain" host="0.0.0.0" port="8086" connectionIdleTimeout="60000"/>
    <http:request-config name="http_request_cd_domain" host="0.0.0.0"  port="8086" responseTimeout="60000"/>

</domain:mule-domain>


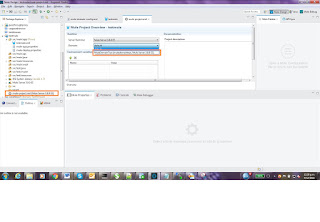
Now to test this domain project I am creating a small project which gives a string output. So my first project is “TestMule”. Open the “mule-project.xml” of this project and select the “MuleTestDomain”  (Which we have created to test) from the domain drop down button.


You can see the connector is coming in “connector configuration” for “TestMule” project. Once you select this connector means you have started sharing connector of MuleDomainTest. Give the path as “/testmule”. I have added payload as “Hello Mule” here.


In the same way create another project and with the name of “TestHelloWorld” and follow the above process and select your MuleTestDomain connector. Here just change the path with “/testhelloworld”. I have added payload as “Hello World” here.


To run the both project simultaneously, right click on project go to “Run as” and then click on “Run Configurations”.


You can see here 2 projects are coming under our new domain. Select both project “testhelloworld” and “testmule” and click on Run button.


You can see the both project have been deployed under “MuleDomainTest


Now to test their sharing, hit the both below URL and check their output by just changing the URL path.
  • http://localhost:8086/testhelloworld
  • http://localhost:8086/testmule


In the above screen you can see that both project are running in same domain and both has common base path.


Tuesday, December 6, 2016

How to call stored procedure from Mule Soft ESB

I have created a stored procedure which needs to be called from the mule soft. Stored procedure has been created in Oracle and it inserts the details in an employee table. If insertion is success or failed then it gives a result code and results description as a part of output.


Stored Procedure:

Create or replace PROCEDURE SP_EMP 
(
  EMP_ID IN VARCHAR2 
, EMP_NAME IN VARCHAR2 
, EMP_ADDRESS IN VARCHAR2 
, RESULT_CODE OUT VARCHAR2 
, RESULT_DESC OUT VARCHAR2 
) AS 
BEGIN
  INSERT INTO EMP_DETAILS VALUES (EMP_ID, EMP_NAME, EMP_ADDRESS);
  RESULT_CODE:='0';
  RESULT_DESC:='SUCCESS';
  EXCEPTION WHEN  OTHERS THEN 
  RESULT_CODE:='-1';
  RESULT_DESC:='FAILED';
END SP_EMP;


Once we are ready with Stored procedure, can go ahead creating a project in Anypoint Studio.
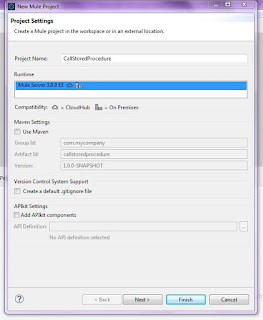
Create a Mule project with the name of “CallStoredProcedure”.

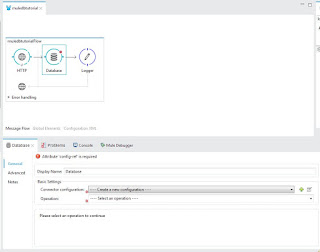
Drag connection in canvas as mention below starting with Http, variable, database and then a logger to log values.


Now click on “Http” connection and configure the values.


Clcik on “+” icon in “Connector Configuration” and fill the below details (automatically filled) and click “OK”.

Now click on Variable and provide a static value to it, in my case I have given “111” value to Emp_ID variable.


Now click on the Database connector to connect the Oracle Database and then we can call our stored procedure from there.


Click on “+” icon below screen will come then select “Oracle Configuration” and click OK button.


Fill the necessary detail to connect the Oracle Database. You need to add oracle connector driver to make it work otherwise it will give error. I have added a JDBC connector from my local machine.


Now click on “Test Connection” to test our connectivity. If everything goes successful then it will give you success message else failed message. Click on OK button to proceed further.


Now connectivity is fine and now time to call stored procedure. To do this you need to choose “Stored Procedure” in Operation drop down and write below query in “Parameterized Query” window.

Now add the parameter by clicking the “+” icon and define “IN/OUT” parameter. You can provide the values into it in “Values” section. I have taken EMP_ID value from the variable, EMP_NAME is a static value as “SHRI” and getting address from URL as dynamic value.


Now click on the logger connector to log the payload values.


We are all set to go, now run the program and hit the “localhost:8081?ADDRESS=Raebareli” URL in your favorite browser.


Just after hitting the URL you can check the records in Database table.


Just look into the logs, you will be able to find proper output there of the stored procedure.


You can make any decision based on the output provided by the stored procedure.


Mule Canvas Code:


<?xml version="1.0" encoding="UTF-8"?>

<mule xmlns:http="http://www.mulesoft.org/schema/mule/http" xmlns:db="http://www.mulesoft.org/schema/mule/db" xmlns="http://www.mulesoft.org/schema/mule/core" xmlns:doc="http://www.mulesoft.org/schema/mule/documentation"
 xmlns:spring="http://www.springframework.org/schema/beans" 
 xmlns:xsi="http://www.w3.org/2001/XMLSchema-instance"
 xsi:schemaLocation="http://www.springframework.org/schema/beans http://www.springframework.org/schema/beans/spring-beans-current.xsd
http://www.mulesoft.org/schema/mule/core http://www.mulesoft.org/schema/mule/core/current/mule.xsd
http://www.mulesoft.org/schema/mule/http http://www.mulesoft.org/schema/mule/http/current/mule-http.xsd
http://www.mulesoft.org/schema/mule/db http://www.mulesoft.org/schema/mule/db/current/mule-db.xsd">
    <http:listener-config name="HTTP_Listener_Configuration" host="0.0.0.0" port="8081" doc:name="HTTP Listener Configuration"/>
    <db:oracle-config name="Oracle_Configuration" host="localhost" port="1521" instance="xe" user="SYSTEM" password="SYSTEM" doc:name="Oracle Configuration"/>
    <flow name="callstoredprocedureFlow">
        <http:listener config-ref="HTTP_Listener_Configuration" path="/" doc:name="HTTP"/>
        <set-variable variableName="EmpID" value="111" doc:name="Variable"/>
        <db:stored-procedure config-ref="Oracle_Configuration" doc:name="Database">
            <db:parameterized-query><![CDATA[call SP_EMP (:EMP_ID,:EMP_NAME,:EMP_ADDRESS,:RESULT_CODE,:RESULT_DESC)]]></db:parameterized-query>
            <db:in-param name="EMP_ID" type="VARCHAR" value="#[flowVars.empID]"/>
            <db:in-param name="EMP_NAME" type="VARCHAR" value="SHRI"/>
            <db:in-param name="EMP_ADDRESS" type="VARCHAR" value="#[message.inboundProperties.'http.query.params'.ADDRESS]"/>
            <db:out-param name="RESULT_CODE" type="VARCHAR"/>
            <db:out-param name="RESULT_DESC" type="VARCHAR"/>
        </db:stored-procedure>
        <logger level="INFO" doc:name="Logger" message="Result Code : #[payload.RESULT_CODE]  and Result Description :  #[payload.RESULT_DESC]"/>
    </flow>
</mule>

Tuesday, November 29, 2016

How to Connect Database in Mule Soft ESB

In This tutorial we are going to learn the database connectivity. In mule ESB you can connect to any database but here I will try to connect MySQL Database.

I have created a table and inserted some data in that table:


I am using test database and created empdetails table in it also inserted some records as mention in below image.


Now let’s create a program in Mule and try to connect this database and display the results.

Step 1:

Go to File-New-Mule Project below screen will come and give MuleDBTutorial as project name. 


Now click on finish. Below screen will be there.


Step 2:

Drag the HTTP connector into the canvas.


Step 3:

Drag the Database connector into there and it will look like as below screen.


Step 4:

Add logger connector into canvas to capture the logs.


Step 5:

Click on the HTTP connector and configure the property.


Click on “+” icon, below screen wills popup


Click OK.

Step 6:

 Now click on database and update the property


Click on “+” icon and choose the database from below screen.


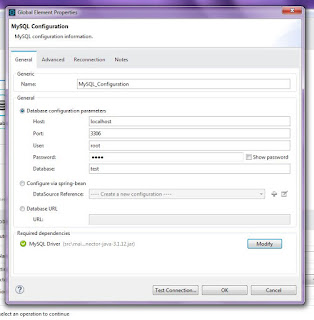
Click on the MySQL Configuration and click ‘OK’.


Fill the necessary details.


Click “Add File” button to add “MySQL Driver”. Once you connect MySQL driver all the error will be gone.

Now click on the “Check Connection” icon to test the DB connection.


If all ok then it will give you successful message.

Step 7:

Now click on the database in canvas and configure the property.


Choose the connection configuration as MySQL and chose operation as “Select” and write query inside of “parameterised Query” box.

Step 8:

Now click on “Log connector” and updated the configuration.


Step 9:

 Now run the programme and hit the URL in browser or POSTMAN application, it will give you the object formed data.


Step 10:

If you want a formatted data then add one more connector which can convert object to String and give you proper data.


Now again redeploy and run the program, it will give you the proper data as mention below.


Step 11: 

Now if you want a parameterized data then add a variable as mention below and pass a particular value.


Step 12:

We need to update the database query to get this dynamic value from the variable.
select * from emp where id=#[flowVars.empID];


Step 13:

Now again redeploy and check the results ad mentioned below.


Step 14:

Now if you want to pass a variable from the URL as per your requirement then again go the variable connector and change the value.
#[message.inboundProperties.'http.query.params'.get('EmpIDVal')]


Step 15:

Redeploy it again and check the results by passing a dynamic value.


Change the value again and check results.